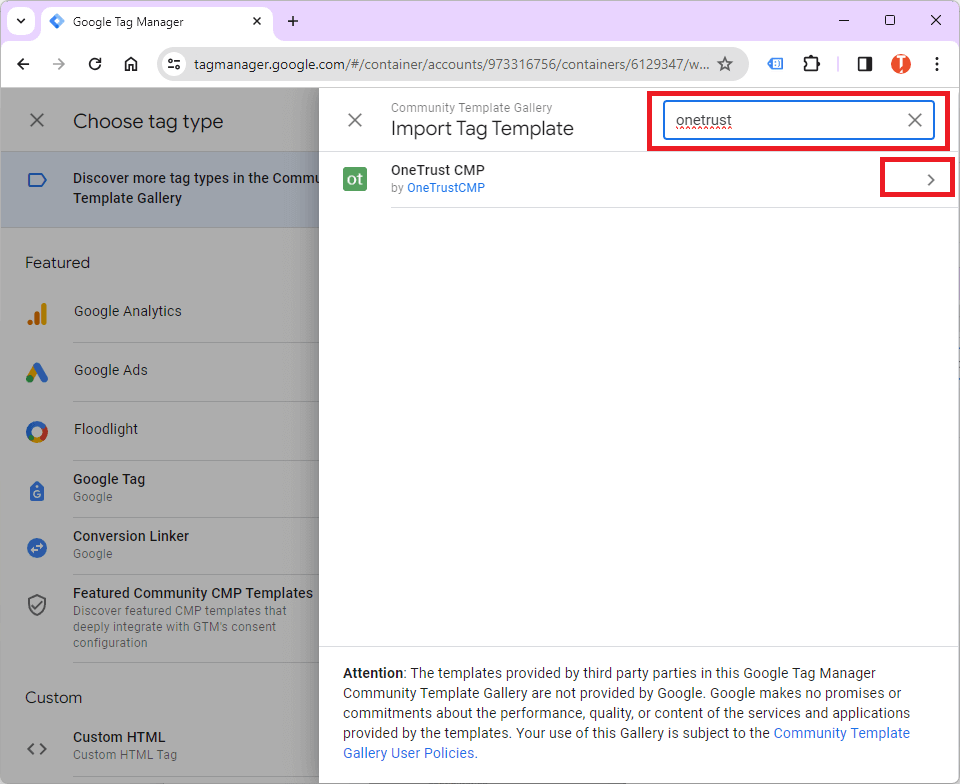
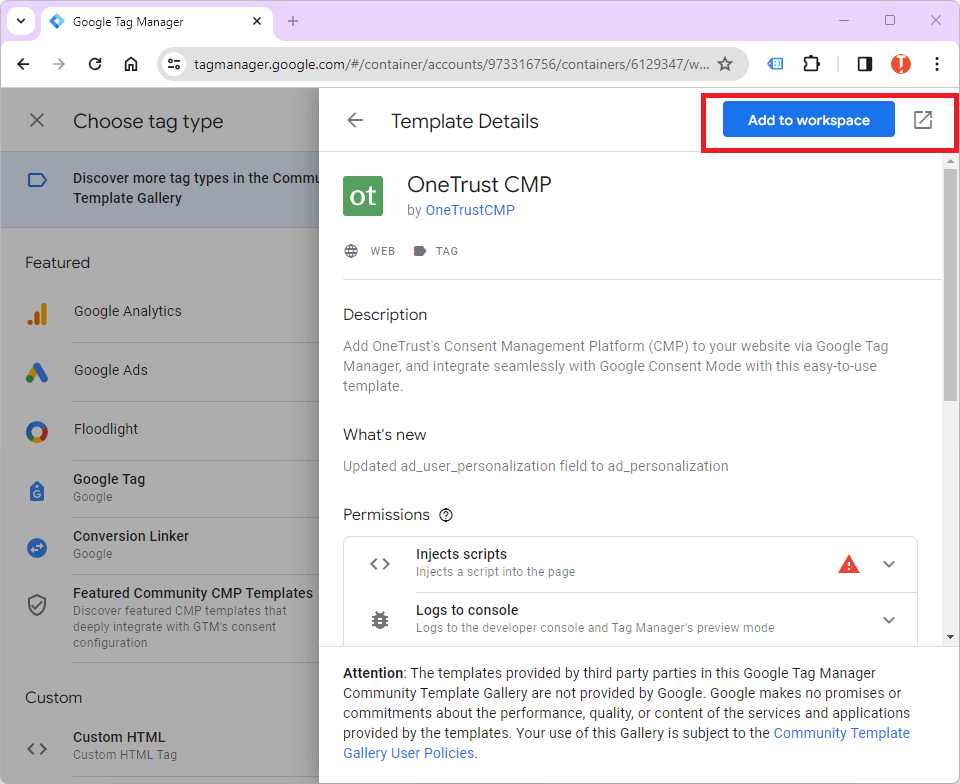
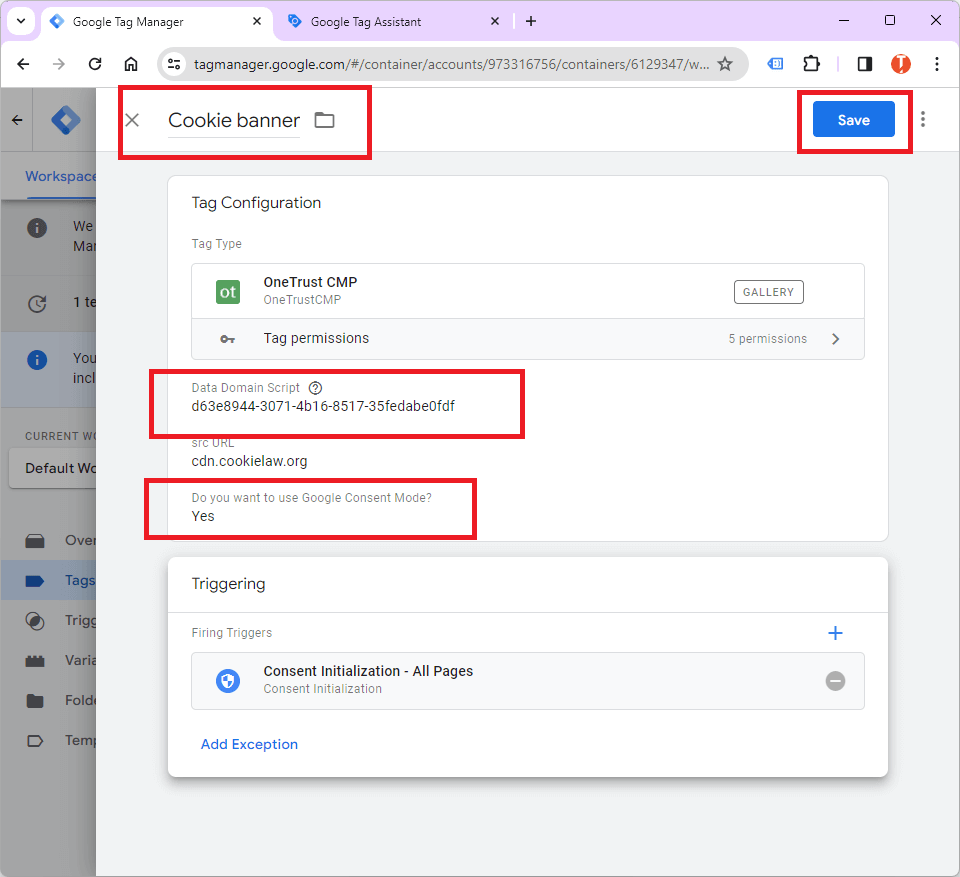
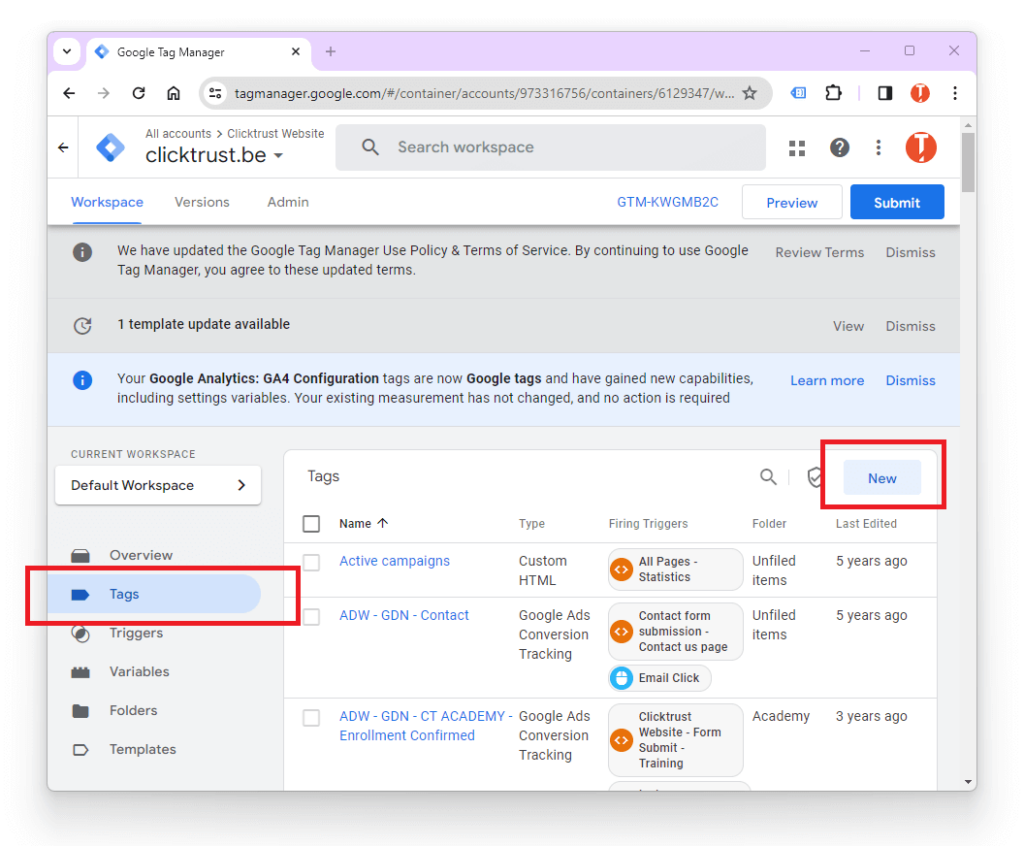
With all the buzz surrounding the recent update to Google Consent Mode, it’s a good idea to refresh the best practices regarding managing consents through Google Tag Manager.
Did you miss the recent update to Google Consent Mode v2? In our previous blog article, you can read more about the implementation of Consent Mode V2.
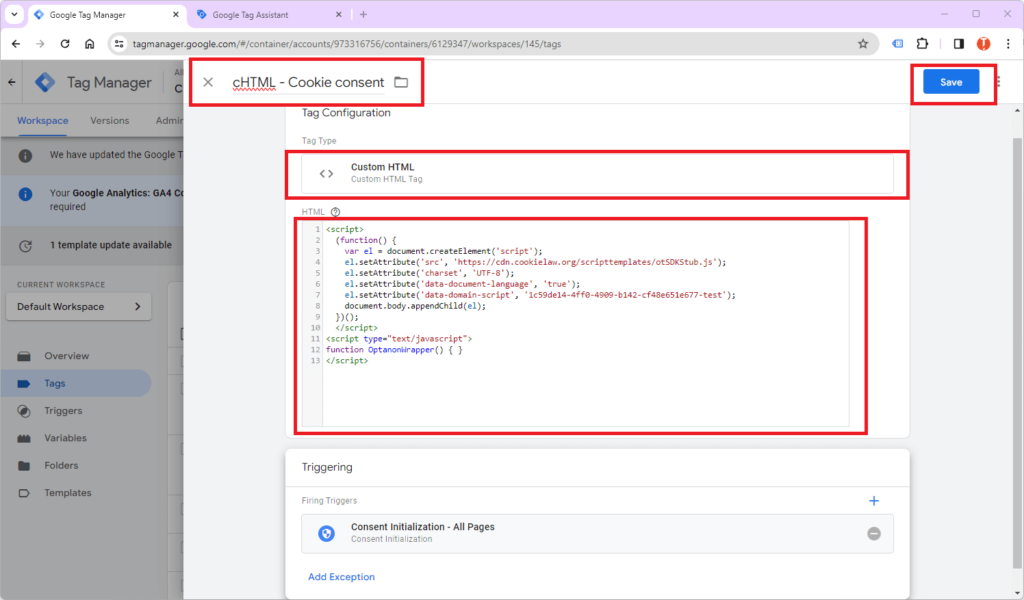
First, I want to clarify that all the implementations discussed in this article will be done through Google Tag Manager, whether it’s implementing the cookie banner, creating tags, or managing consent.
By default, I will implement the Consent Mode in its advanced version (which involves not blocking Google tags while waiting for consent) but I will specify the steps to follow if you wish to adhere to the basic version.
With the introductions out of the way, let’s explore the different ways to implement your cookie banner and various types of tags, regardless of your CMP, to respect user consent. I will try to be as exhaustive as possible to cover diverse scenarios.
How to fire tags based on consent in GTM?
Now that we have successfully implemented our cookie banner, we need to ensure that the different types of tags we want to fire for our marketing or analytics needs are respecting the user’s consent.
Since the Consent Mode V2 update, there are now 2 new consent mode parameters to consider on top of the already existing “ad_storage” and “analytics_storage” consent types:
- “ad_user_data”
- “ad_personalization”

In addition to the consent mode parameters, there are also the following privacy parameters:

In Google Tag Manager, there are several ways to take consent into account before triggering different types of tags such as those from Google Analytics, Meta, or Hotjar… Each of these methods has its advantages and disadvantages.
I have decided to keep 3 implementation methods that should meet all tagging needs. It is worth noting that these methods are compatible with each other. You could very well use one method for a specific tag and adopt another solution for another type of tag. The essential thing is to be able to track as best as possible the information you are interested in based on the consent given by users.
Tag consent management via the “Consent Overview” feature
The first of these methods is technically the easiest to manage. It consists of activating the “consent overview” functionality in the GTM container settings.
Nevertheless, there are 2 disadvantages to this way of managing consent:
1. This method is still in BETA and therefore difficult to recommend (even though we have not observed any consent management-related errors).
2. The consent overview is not compatible with all CMPs. In this respect, Google’s CMP Partners are all well compatible with this feature although for some not all types of consents are automatically supported.

If you use a solution other than that offered by the CMP partners, it is not impossible for the different consents to also be supported, but their proper functioning is not guaranteed.
A simple way to check if your CMP’s consent is identified by GTM is to switch to preview mode on your website, accept one or several cookies, and verify from the tag assistant if the selected consents have been taken into account in the “cookie update” event in the “Consent” tab.
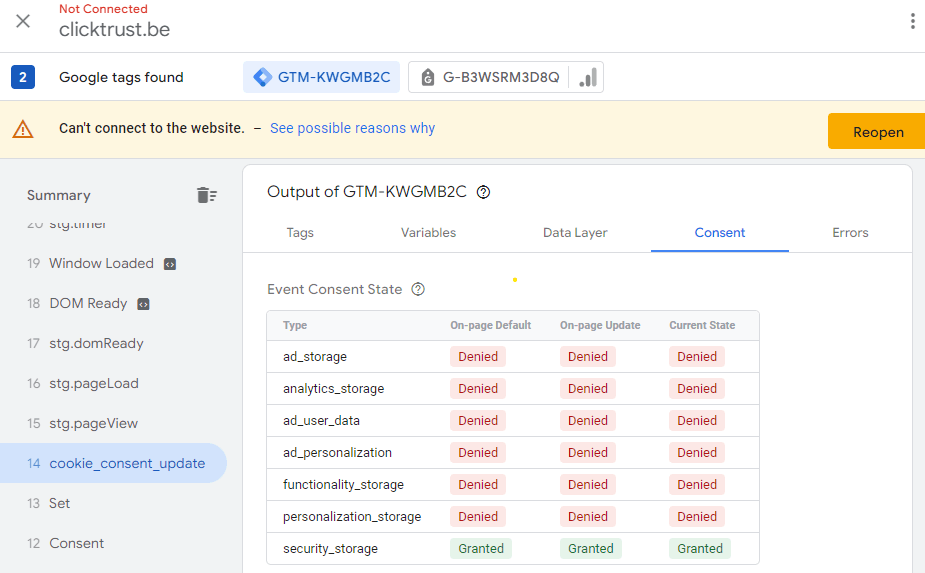
If the list of different cookies is well taken into account and it matches your selection, you can consider that Google has access to users’ consent and can manage consent via the consent overview.
Activating the consent overview couldn’t be simpler:
Go to the “Admin” page of the container and click on “Container Settings” in the “Account Settings” section.
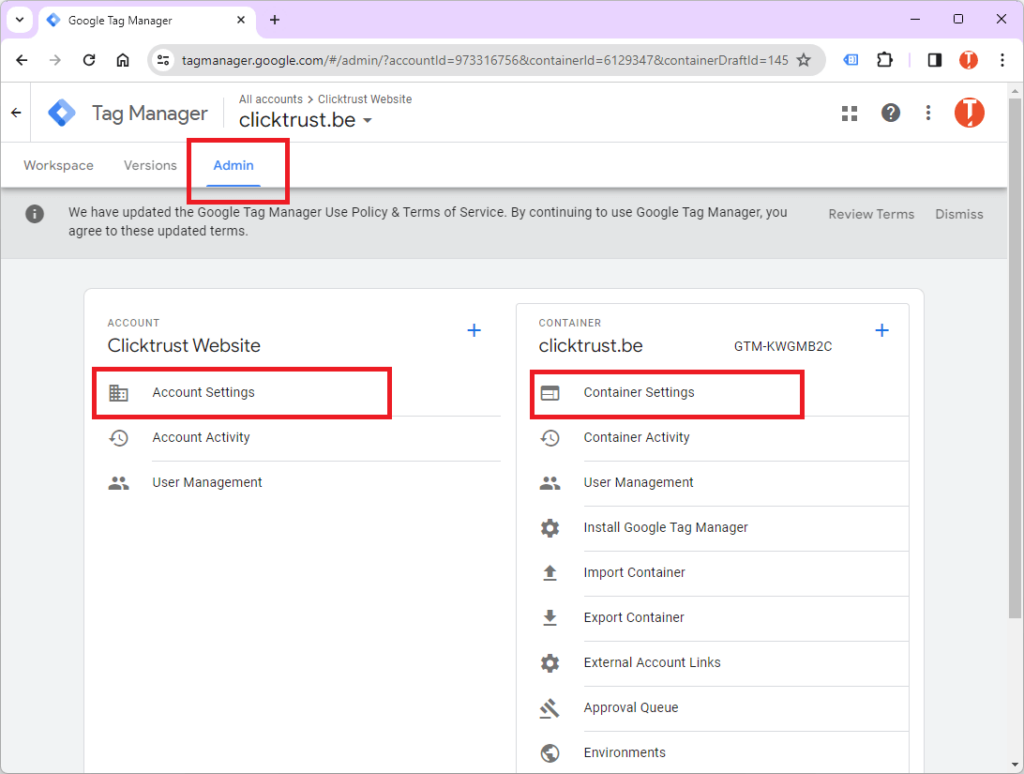
Then, simply check the “Enable consent overview” box.
![]()
As soon as you have activated the “Consent overview” box, you will see a new icon appear from the tags page which will give you access to the consent settings.
Now that the consent overview is activated, we will proceed to manage the consent for each tag by clicking on the icon.
The Consent Overview window opens, and you can see 2 columns related to consent: “Built-in Consent” and “Additional consent”.
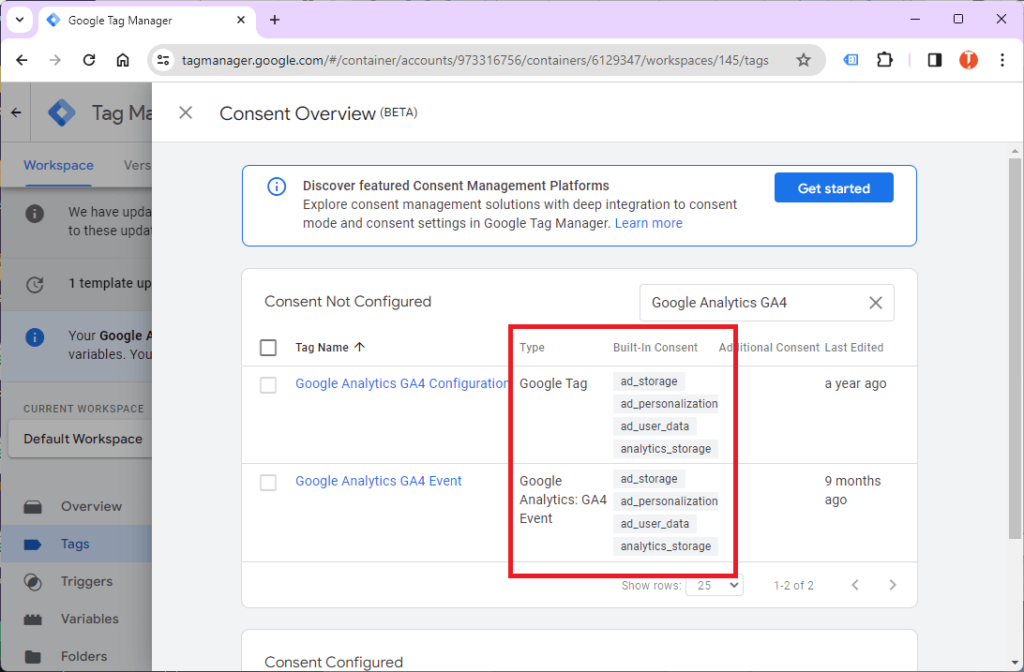
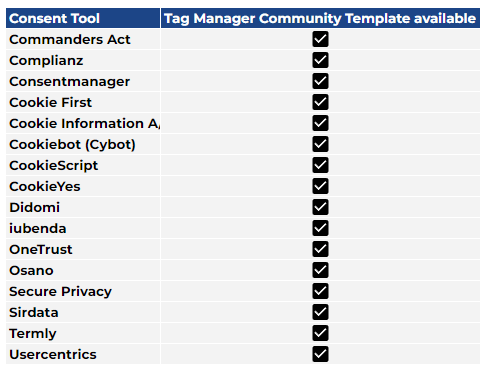
Some types of tags will naturally have a Built-in Consent. This is the case for Google tags or CMP partners’ template tags.
For these tags, no additional configuration is necessary since the necessary consents have already been set.
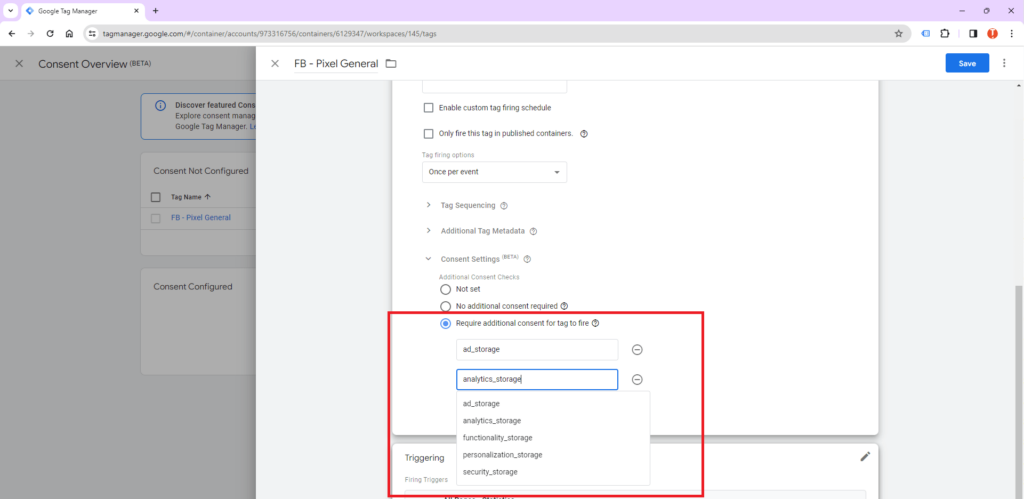
For all other tags that do not have a Built-in consent, we will need to manually configure the necessary consents for the tag to trigger. This is the case, for example, for the FB pixel if you have implemented it via Custom HTML.
To manually manage the consent settings of a tag, simply enter your tag and in the “Consent Settings” section, check the “Require additional consent for tag to fire” box. Finally, manually add the necessary consents for your tag to trigger.
Note that it is also possible to configure the tags in bulk from the ‘Consent overview” window.
To do this, check all the tags you want to adapt in one go and click on the small icon to the right of the search bar.
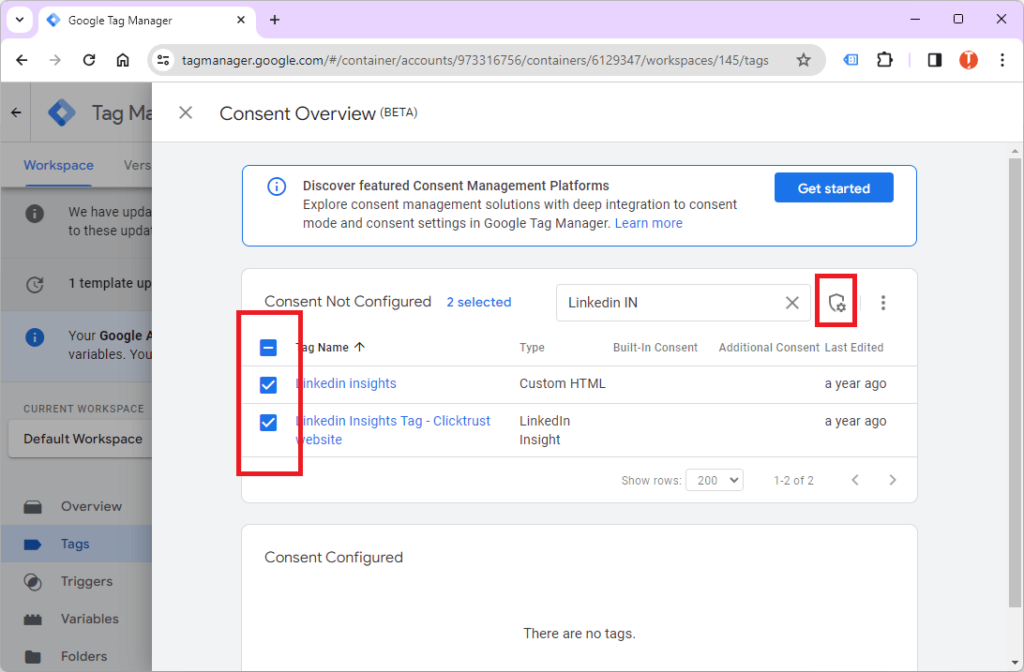
A new window opens, and you will be able to configure several tags simultaneously and click on “Save”.
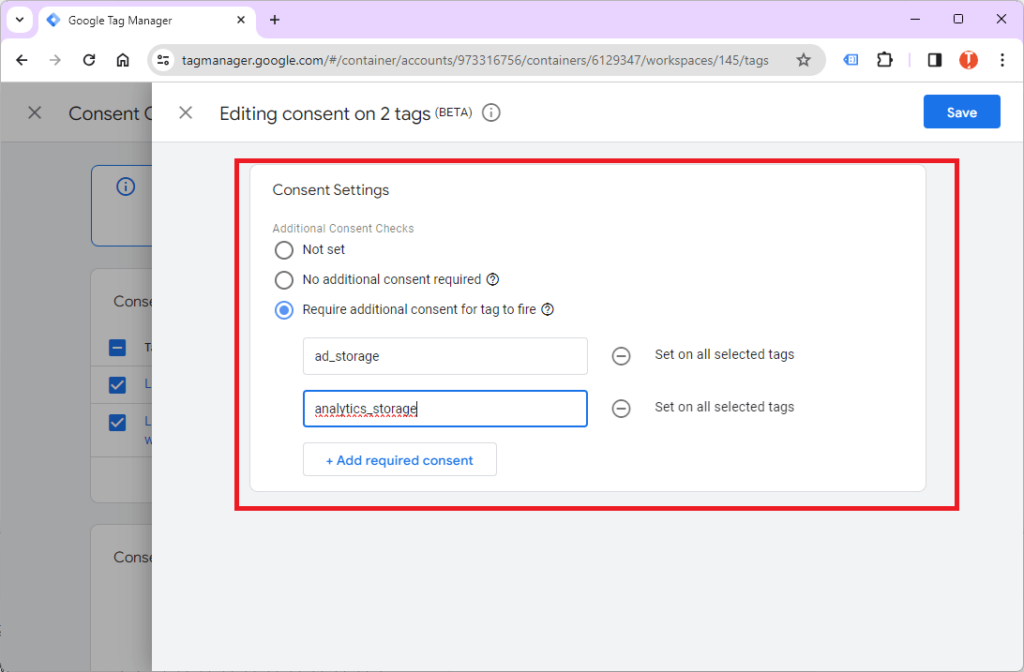
After having adapted the missing consents of all the tags available in your container, you can now check the proper triggering of your tags by going into preview mode through the tag assistant and publish a new version of your container.
Tag consent management via specific triggers
For those who are unable to use the consent overview or do not want to risk using a feature that is in BETA, there is the possibility to ensure proper tag deployment by configuring triggers related to user consent (ad_storage, analytics_storage…) and linked to the action you want to track (click, page view…).
To take into account consent and the user’s action to trigger your tags, several options are available to us. Two of those options will be developed here:
- The use of Trigger Groups
- The use of Firing Triggers and Blocking triggers
In all cases, the first step is to create a new variable that will allow us to identify the consent state related to the cookie banner.
Creating a 1st Party Cookie variable to read user consent levels
Before creating our 1st Party Cookie in GTM, we will need to identify the name of the consent cookie via Chrome DevTools.
To access DevTools, right-click on the page and click “Inspect” or use the keyboard shortcut. (CTRL + SHIFT + I)
Once the DevTools window is open, go to the “Application” tab, and in the “Storage > Cookies” section, click on your domain name.
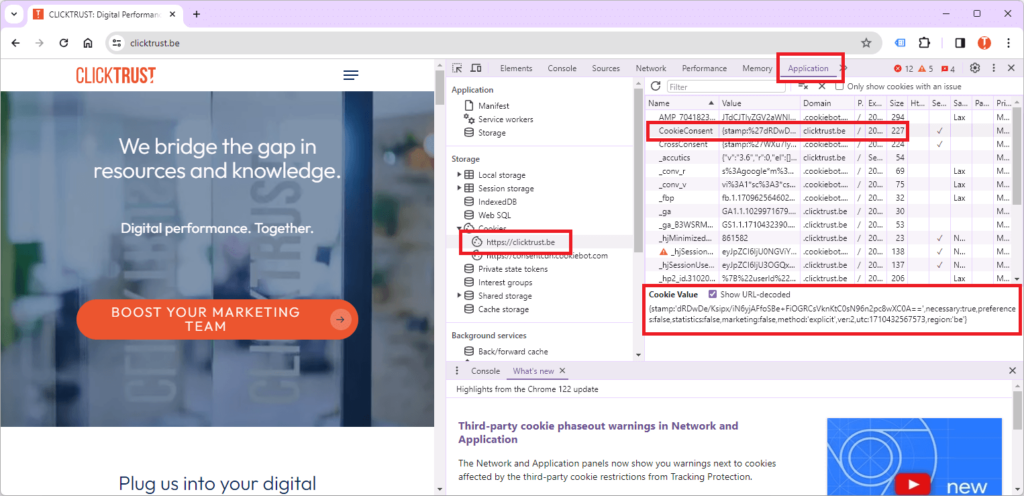
The name of the cookie containing the consent levels varies from one CMP to another but is generally easily identifiable. In this case, the cookie is named “CookieConsent”.
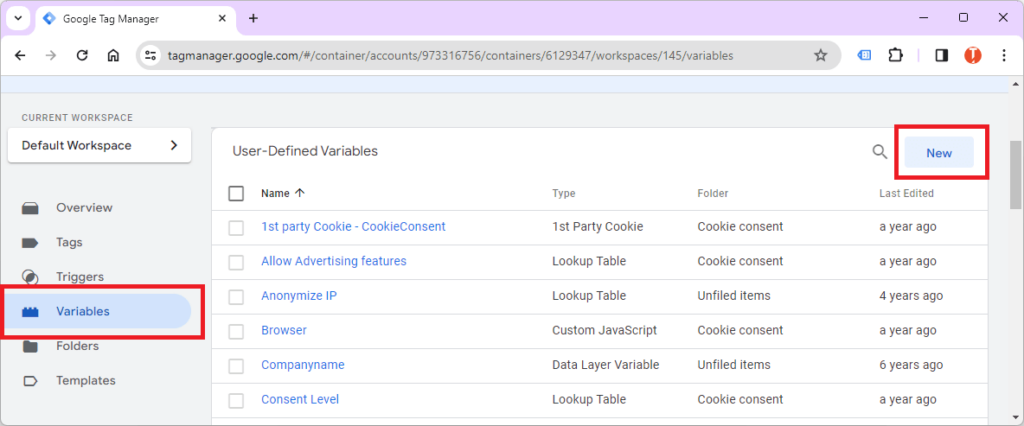
To use the value of this cookie in GTM, simply create a new 1st Party Cookie variable at the level of User-Defined variables.
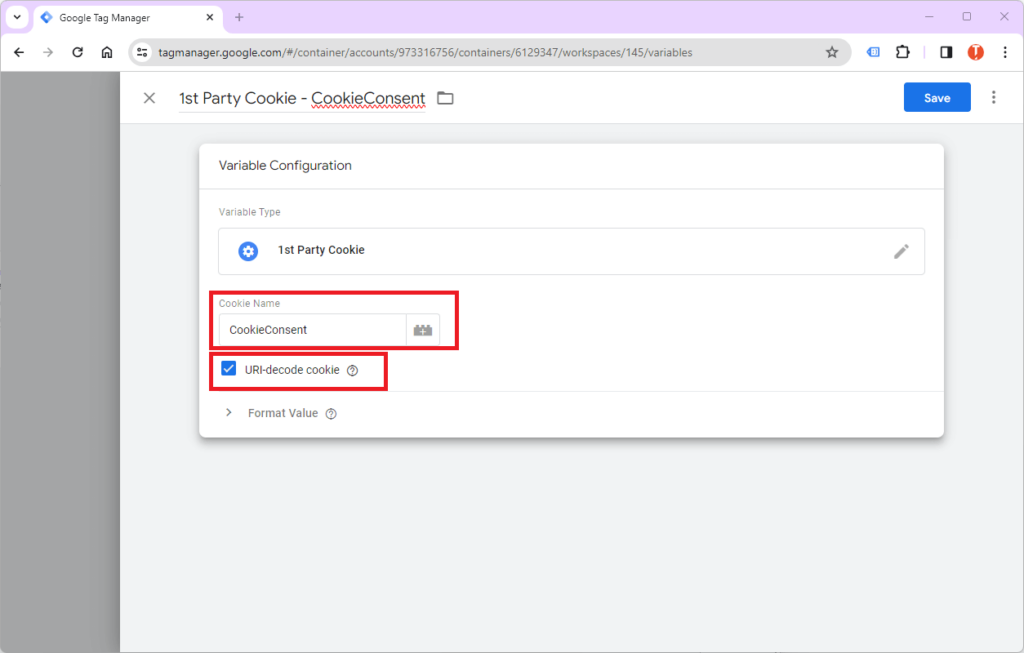
Give your variable a relevant name, select the “1st Party Cookie” variable type, and use the name of your cookie as listed in DevTools (In this case: “CookieConsent”).
If the value of your cookie is encrypted, ensure the “URI-decode cookie” option is checked so that it can be used under good conditions.
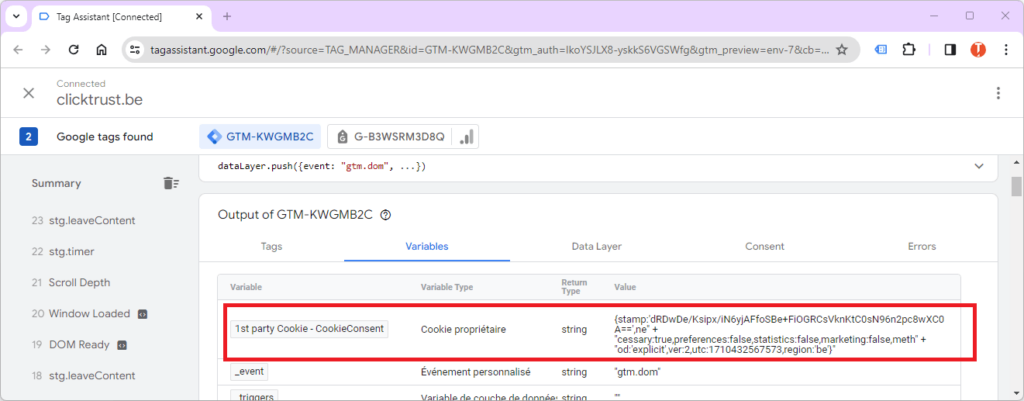
The result of the variable is now available for each event that occurs on the page and is visible in preview mode.
Now that we have created a variable to identify the level of consent, we can configure the triggers that will allow us to deploy our tags according to the required consent.
1. Trigger group method.
The first method involves using a trigger group. The idea is simple: a combination of triggers must be met on the page for the tag to deploy. Therefore, we will create a trigger related to consent and another trigger related to the action we wish to track.
As an example, we will configure a Google Ads conversion tag that requires the acceptance of marketing cookies.
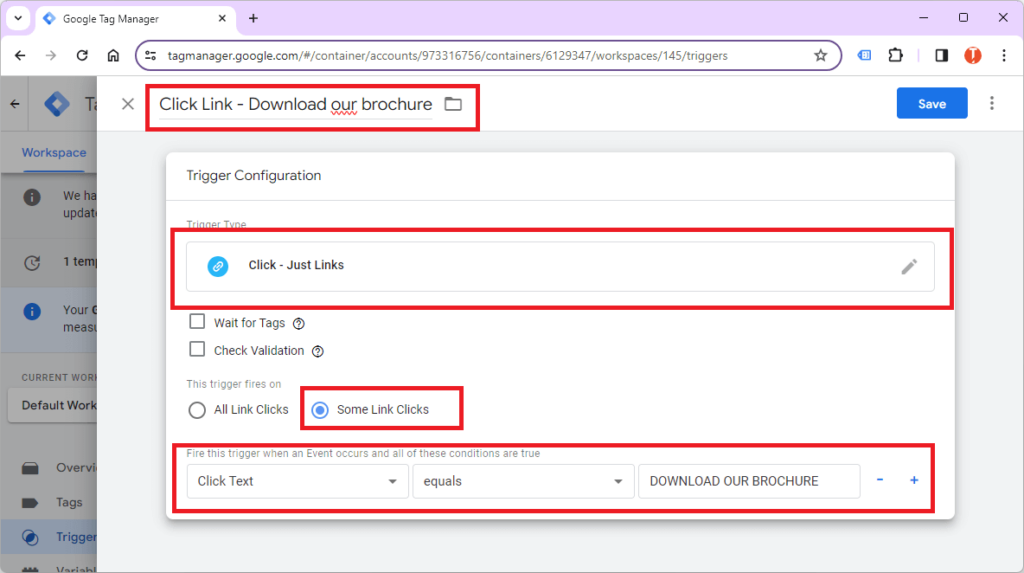
We will create a specific trigger for the conversion, namely a click on the “Download our Brochure” button present on our website.
We will also create a trigger that ensures that the consent for marketing cookies has indeed been granted by the user.
Let’s first configure our click on the “Download our Brochure” button.
To track this action, I will use a trigger on the Link Click event by filtering on the value of the “Click Text” variable.
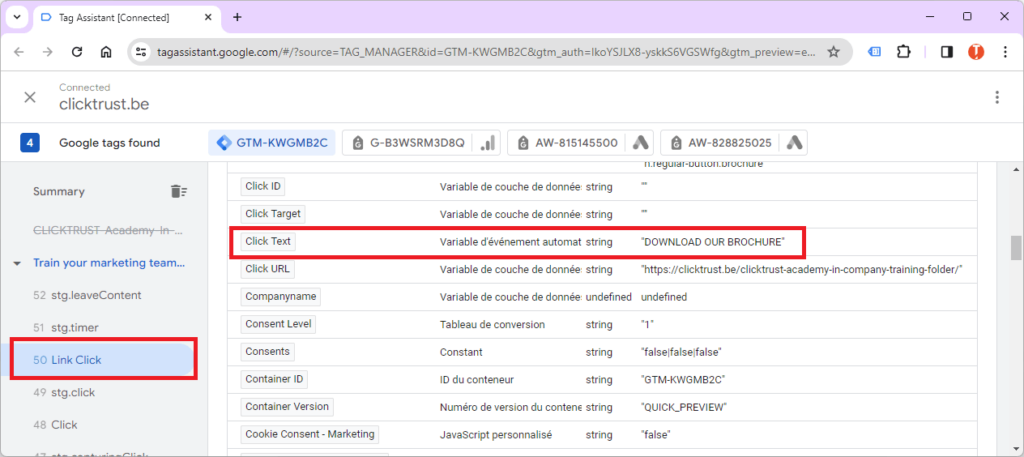
Here is what my trigger in GTM will look like to track this action:
Now, let’s move on to creating the consent-related trigger. In this case, we wish for consent for marketing cookies to be granted.
There are several consent-related events on the page in question: “Consent” and “cookie_consent_update”. Prefer the cookie consent update because it summarizes the global consent status at the end of the page load or with each update in the cookie banner.
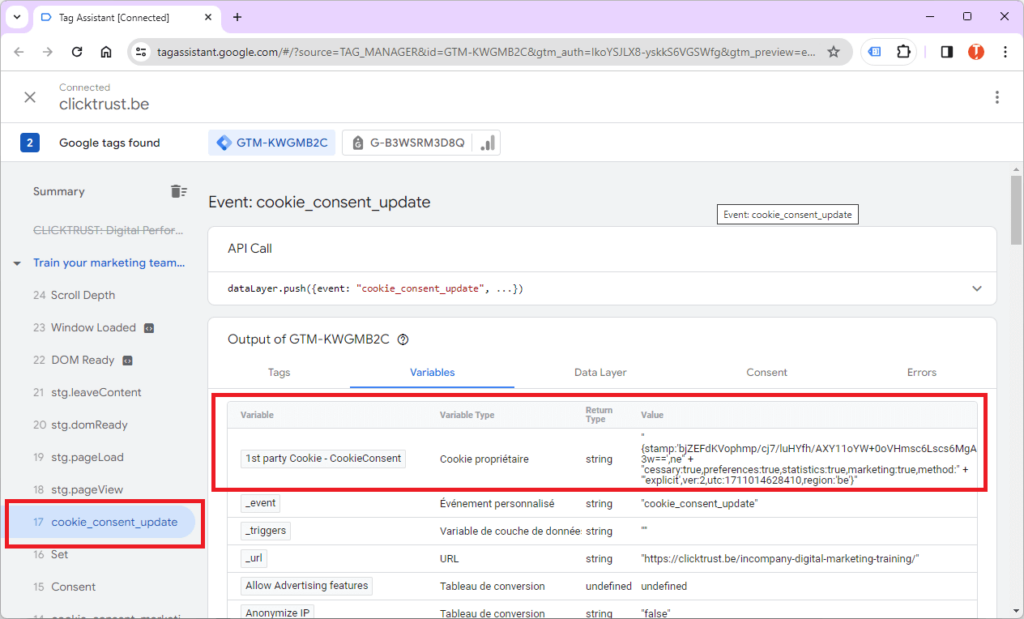
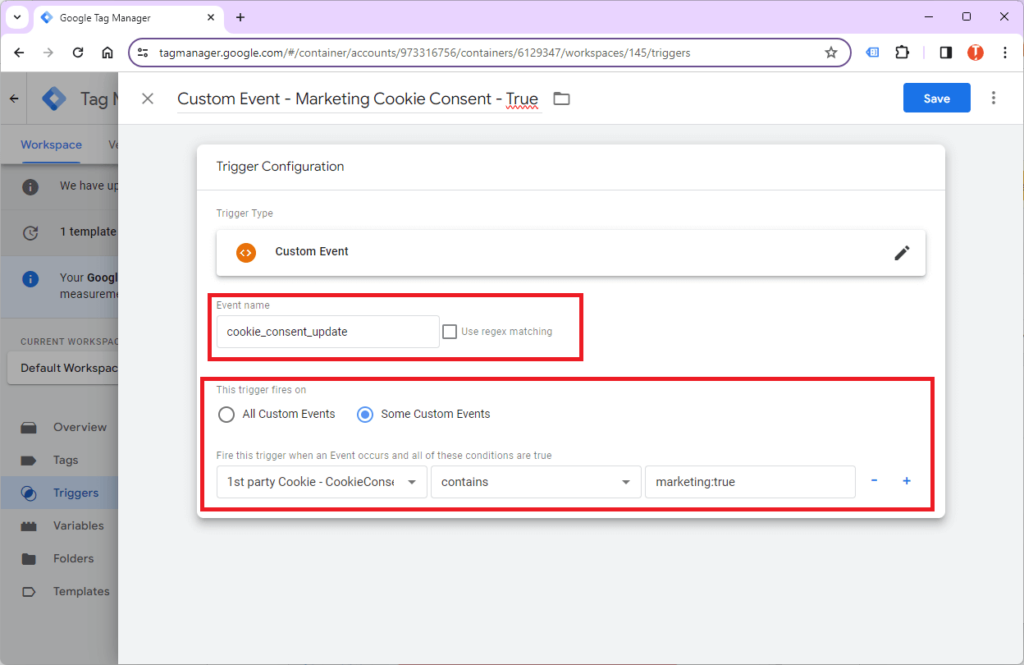
To ensure that consent for marketing cookies is indeed granted on the page, we will configure a Custom Event trigger on the “cookie_consent_update” event and ensure that the value of the cookie consent-related variable contains “marketing:true”.
Here is what our consent-related trigger for marketing cookies looks like:
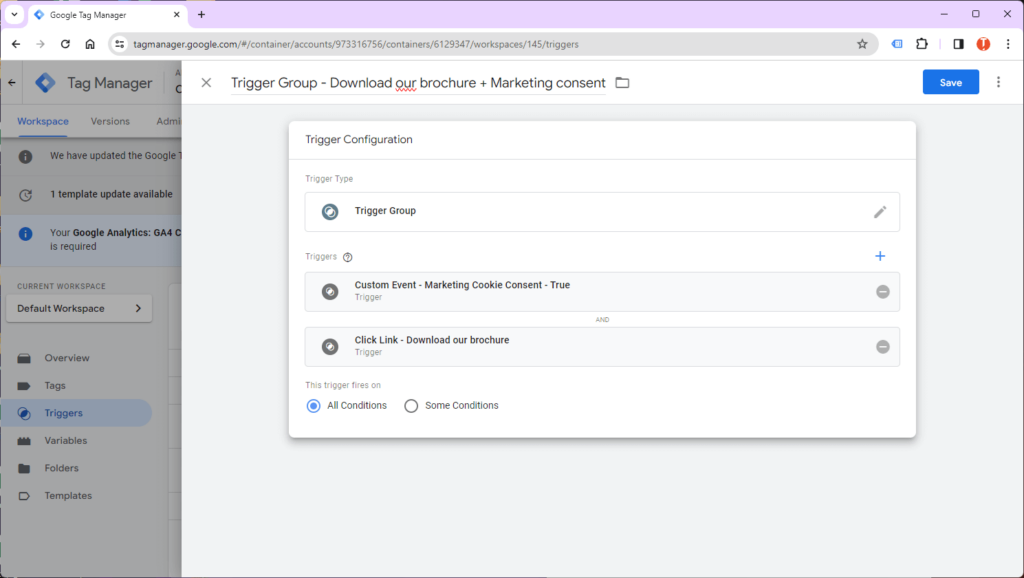
Now that we have created our basic triggers, we can configure our Trigger Group, which will ensure that both conditions are met to deploy our Google Ads tag.
To do this, simply create a new Trigger, then select Trigger Group as the trigger type. Select the two triggers you previously created, and click Save.
Now that our trigger is ready, we can create our Google Ad conversion tag, which will be triggered.
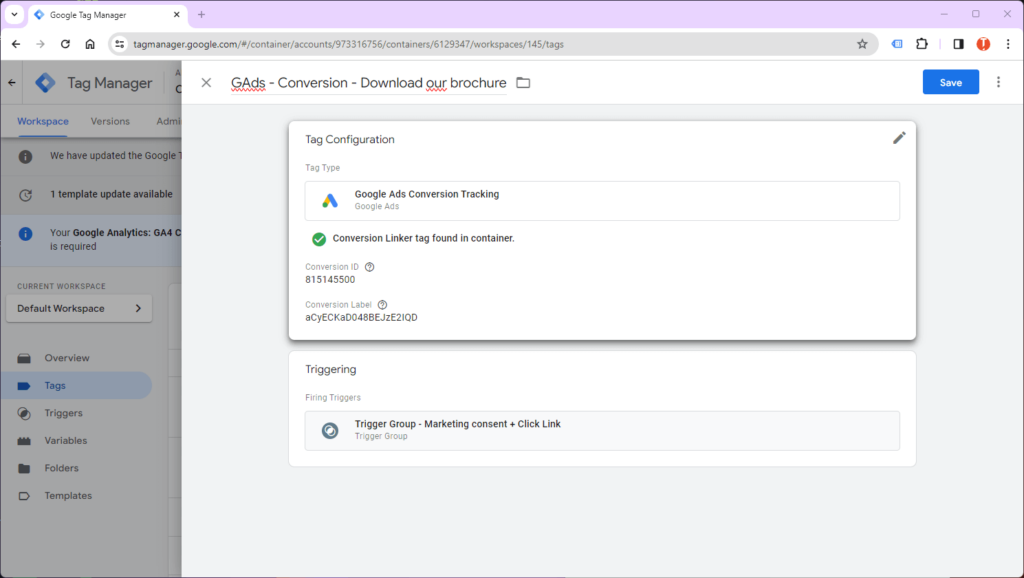
Test your tag in preview mode, and when the two initial conditions of your trigger group are met, you will observe a new “Trigger Group” event appear.

2. Firing and ‘exception triggers’ method
The principle of this method is similar to that of the Trigger Group, but its operation is the opposite.
We will create a trigger related to the action and another trigger related to consent, except in this case, we will block the deployment of the tag if consent is not granted through an exception trigger.
To revisit the previous example, we will need a trigger related to the action and a trigger that blocks the tag’s firing if marketing consent is not respected.
Since we have already configured our action-related trigger, we can directly proceed to create our exception trigger. In this case, a trigger when marketing consent is not granted (the opposite of the Trigger Group method).
Here is what our exception trigger looks like.
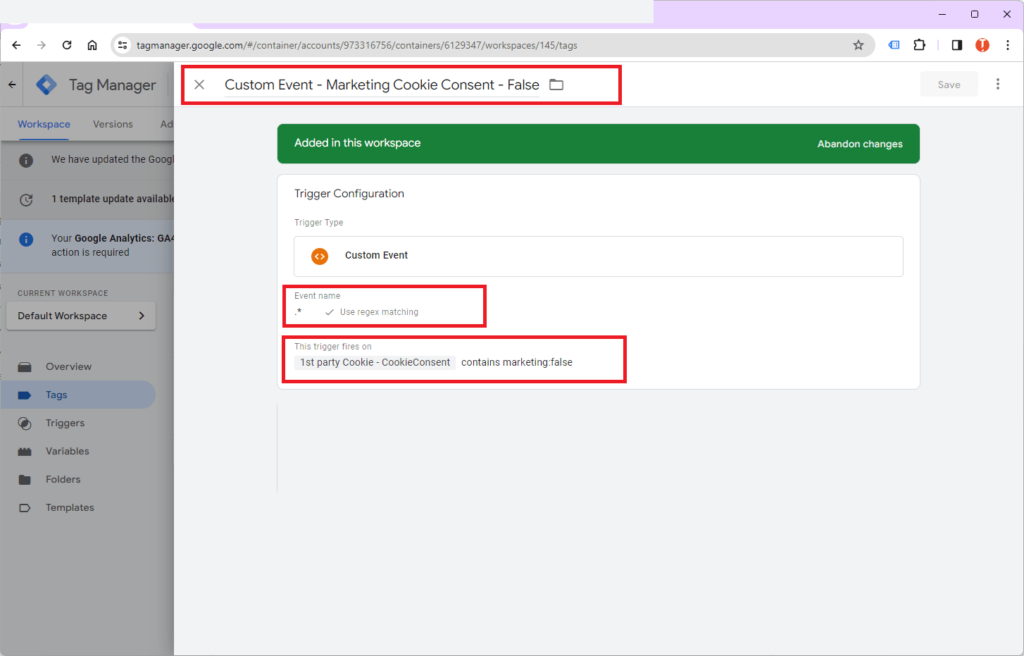
The only difference with the trigger used in the Trigger Group method is that we will deploy the tag on any event using a regex.
We will now configure our Google Ads conversion tags.
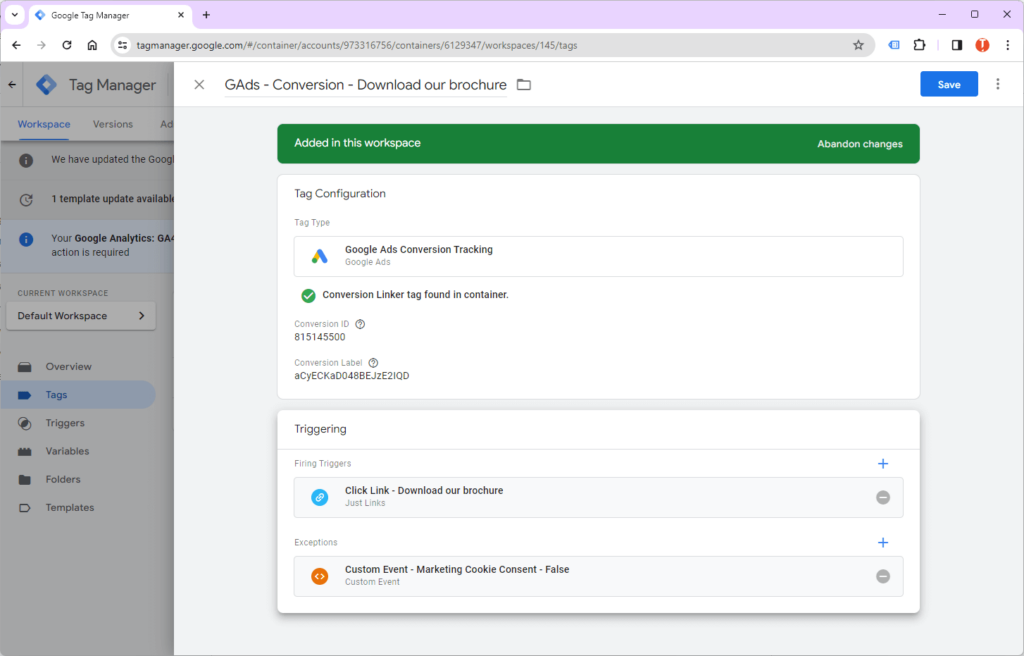
We will be able to directly use the trigger related to the action we wish to track, but we will add an exception that will block the deployment of the tag if marketing cookies are not accepted.
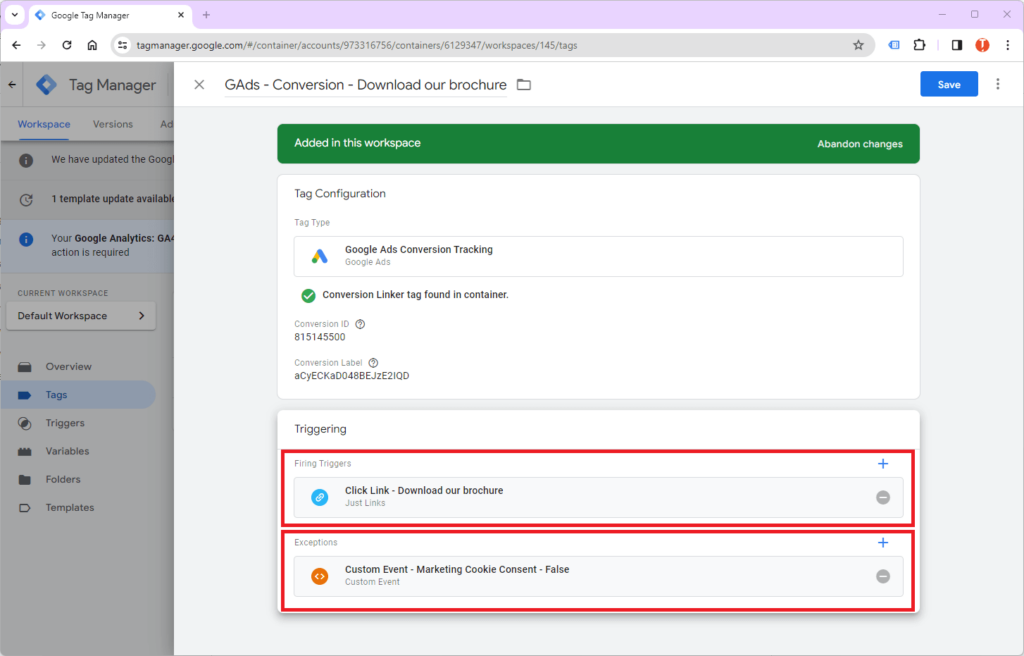
Save your tag and test its proper functioning in preview mode before publishing.
Recevez notre newsletter &
nos insights
Nous approfondissons les sujets brûlants du marketing numérique et aimons partager.

