Imagine having your own AI assistant that can pull real-time Google Ads performance data and help you optimize campaigns — instantly. Sounds futuristic? It’s not. In this guide, we’ll show you two ways to connect Google Ads to Claude using an MCP.
What you’ll get
- A working integration between Claude and Google Ads
- The ability to ask questions like: “Which campaigns had the best ROAS last month?”
- Two setup options: via NA10 or via the TrueClick plugin
Method 1: Using N8N + Claude
N8n is an automation platform that allows you to build workflows between your ad platforms and your AI assistant.
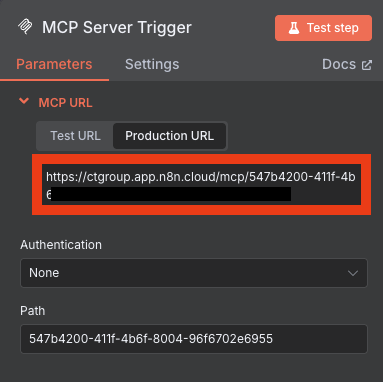
Step 1: Set Up your MCP Node in n8n
- Log into n8n.
- Click “Add Node” and choose “MCP Server Trigger”.
- Don’t configure it yet — just note the Production URL generated. You’ll need it later.
Step 2: Add the Google Ads Tool
- Add a new tool → Choose Google Ads.
- Insert your Google Ads API credentials:
- Client ID and Client Secret (from Google Cloud Console)
- Developer Token (from your Google Ads admin > API Center)
- Client ID and Client Secret (from Google Cloud Console)
🔑 Tip: Don’t forget to authorize using the redirect URL generated from your MCP node.
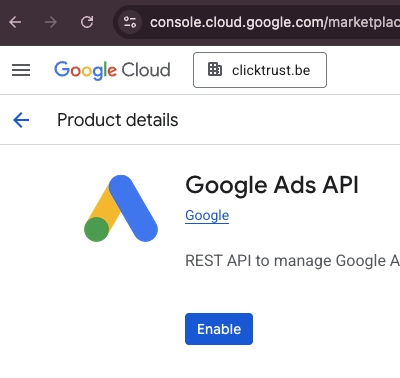
Step 3: Enable the Google Ads API
- In Google Cloud Console, enable the Google Ads API for your project.
- Click “Enable”, then return to n8n.
- A pop-up will let you connect to your Google Ads account directly.
Step 4: Final configuration in Claude
- Go to Claude’s Settings:
- On Mac: Command + ,
- On Windows: File → Settings
- On Mac: Command + ,
- Open the Developer tab → Click “Edit Configuration”
- Paste the MCP integration snippet into the configuration file. Replace the url field with your Production URL from n8n
{
“mcpServers”: {
“n8n”: {
“command”: “npx”,
“args”: [
“-y”,
“supergateway”,
“–sse”,
“PASTE YOUR PRODUCTION URL HERE“
]
}
- Save, close, and restart Claude.
✅ Done! Claude now has access to your Google Ads data via n8n.
Method 2: Using the Google Ads MCP by TrueClic
This method is ideal if you prefer a plug-and-play solution. In just a few steps, you’ll connect Claude to your Google Ads data using an official GPT token and Node.js.
Step 1: Install Node.js
Make sure Node.js is installed on your system.
- On Windows:
- Open Command Prompt (search for “cmd”).
- Open Command Prompt (search for “cmd”).
Run:
bash
CopyEdit
winget install nodejs
- On macOS:
- Download it from https://nodejs.org and follow the installation instructions.
- (See screenshots at the end of this guide if needed.)
- Download it from https://nodejs.org and follow the installation instructions.
Step 2: Get Your GPT Token
- Go to https://gaql.app
- Log in with your Google account to authorize access to your Google Ads data.
- Click the “Copy GPT Token” button in the top-right corner.
Step 3: Configure Claude
Claude uses a local JSON file to manage plugin configuration.
- Open the Claude desktop app.
- Press:
- CTRL + , (Windows/Linux)
- Command + , (macOS)
- CTRL + , (Windows/Linux)
- In the left sidebar, go to Developer → Edit config
- Open the claude_desktop_config.json file.
- Paste in the following configuration:
json
CopyEdit
{
“mcpServers”: {
“gads”: {
“command”: “npx”,
“args”: [
“-y”,
“@trueclicks/google-ads-mcp-js”,
“–token=YOUR_GPT_TOKEN_HERE”
]
}
}
}
🔁 Replace YOUR_GPT_TOKEN_HERE with the token you copied from GAQL.app.
Step 4: Restart Claude
- On Windows/Linux: Menu → File → Exit
- On macOS: Right-click Claude icon (top panel) → Quit
Then relaunch Claude.
✅ You’re all set! Claude now supports direct Google Ads queries like:
- “Show campaigns with highest cost per conversion in the last 14 days”
- “Summarize performance of top 5 ad groups in account X”