
What is a website migration?
When talking about Website Migration in an SEO context, the term refers to any major changes to the website that have considerable impact on overall visibility and indexability. This means that a website migration does not necessarily imply a change of domain, it might very well be a visual redesign or a change of page structure.
In this article, we’ve put together a handy checklist for website migration in an SEO context. We’ll cover everything from planning and involving the right people to establishing metrics to measure success. Additionally, we’ll also address the development and the post-migration phases.
By following this checklist, you should be able to navigate the intricacies of website migration, ensuring a smooth transition while preserving your hard-earned SEO ranking.
SEO Website migration checklist
Planning Stage
1. Migration planning
Regardless of the changes that you are planning, a proper plan is paramount to a successful migration. Failing to do so might result in some serious damage to your hard-earned SEO ranking. So, without further ado, let’s get started.
As there are various layers and actions to the website migration, it is extremely important to map out every task and assign them to the corresponding stakeholders. Throughout the article, we will discuss each of these tasks in more detail. Although there are numerous project management systems, we prefer platforms such as Asana or Trello. These are simple-to-use web apps that help you break down silos, keep track of progress and improve cross team communication.
2. Involve all stakeholders
Involving all internal stakeholders in the early stages of the process is crucial as website migrations normally involve the entire digital marketing team. This includes:
- SEO experts
- Marketing automation
- Content writers
- Data analysts
- Web developers
- UX specialists
Although mainly SEO specialists and developers will be actually involved in the technical migration of the website, it is critical to involve key stakeholders to give them the opportunity to highlight potential challenges with the implementation. Moreover, raising awareness in the early stages of the migration will avoid last minute surprises.
3. Metrics overview
Before getting down to the technical nitty-gritty, you should establish the metrics that are going to be used to evaluate the success of your migration. These include:
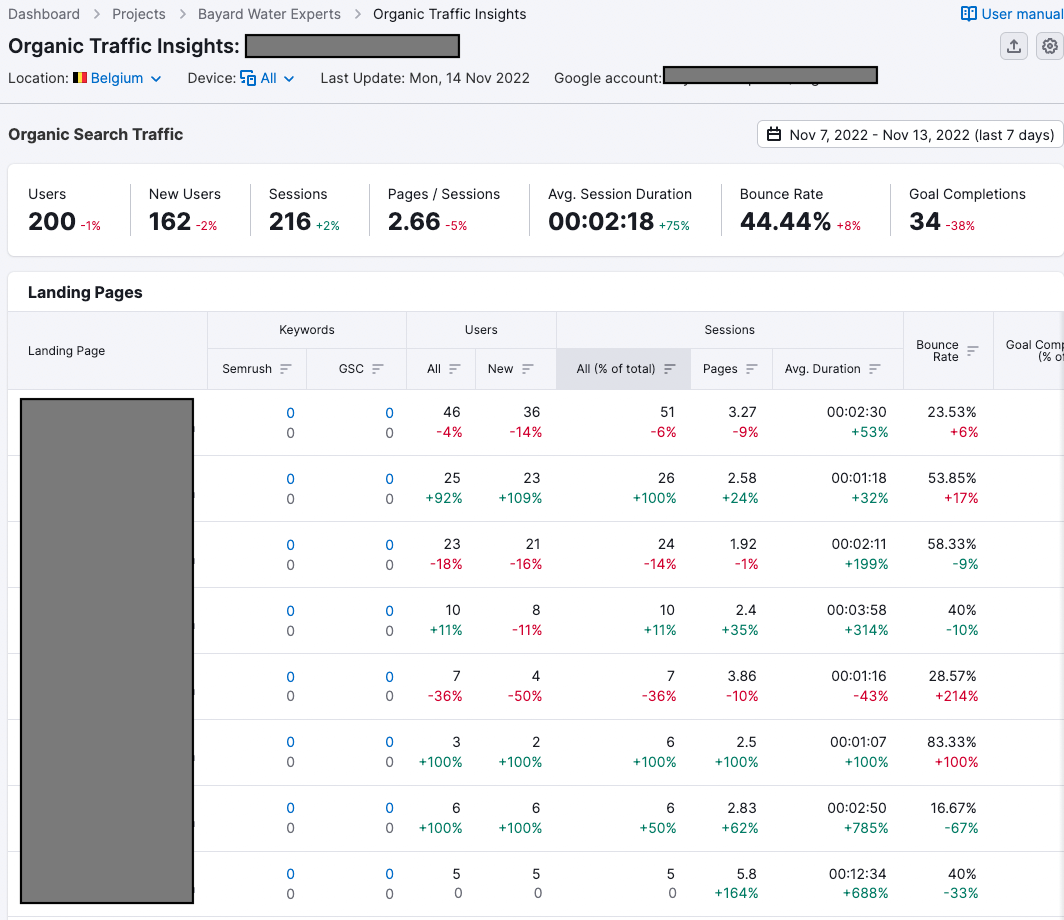
Organic search traffic
Regardless of the extent of your website migration, you should keep a close eye on organic traffic, meaning any traffic that comes to your site from a search engine, but that isn’t paid for. At CLICKTRUST, we track organic search traffic using SEMrush.
Organic visibility
Here we mainly look at our website visibility. This is a metric that shows how frequent a website or a certain keyword is shown on the web. In this specific case we look at the visibility per category as well as the percentage of relevant keywords ranking in top 3, top 10, top 20. Just like organic traffic, to track organic rank we like using SEMrush for this. Within the platform’s Position Tracking section, SEMrush estimates the Visibility for a set of keywords that you have chosen.
Page crawled & Indexable URLs
We can find a complete list of current pages crawled and indexed by navigating to Google Search Console (GSC). Within GSC, in the section Index → Pages, you will find a graphical overview of indexed/non-indexed pages and the reason why they have not been indexed yet. Below you can find a snapshot of what this looks like.
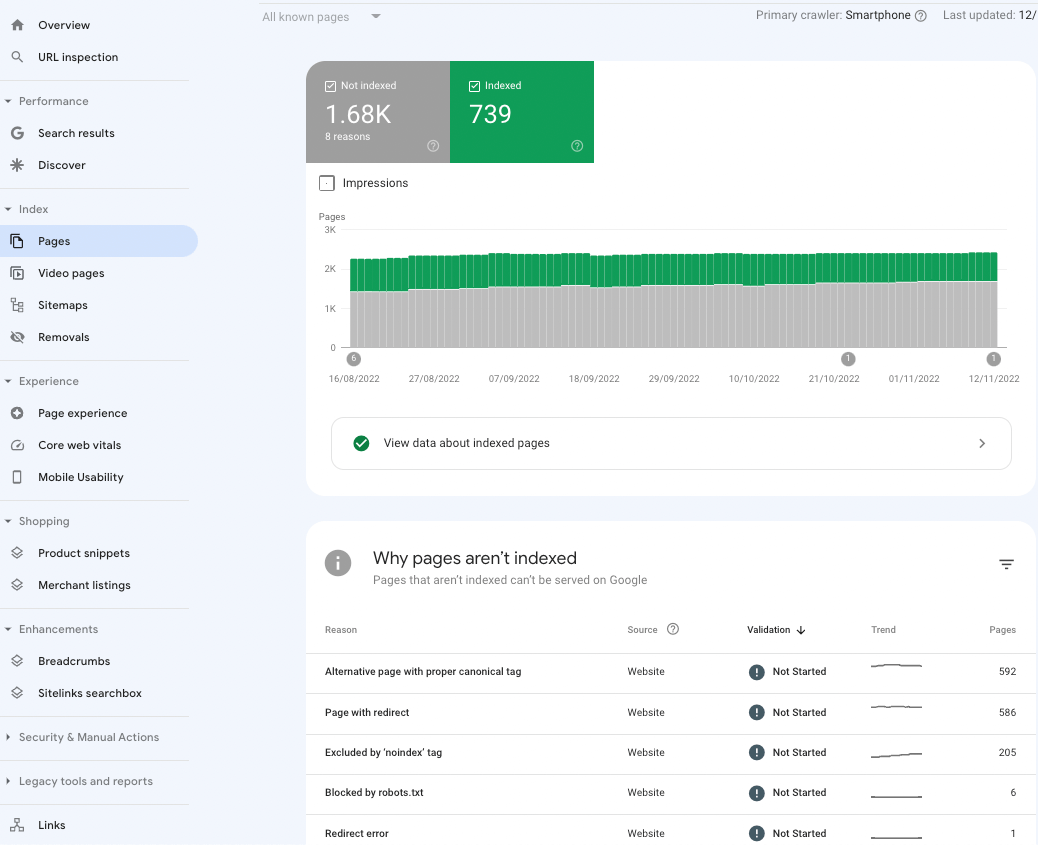
By clicking on one of the reasons why pages were not indexed, GSC will provide you with a list of URLs affected.
If you have not set up a GSC account, we strongly suggest doing so. This is a free tool that helps users measure their site’s traffic, see keyword performance, fix issues, and receive messages from Google about their website. It provides insight on how a website is doing in organic search as well as ways to make adjustments to the site in the Google index.
A decrease in indexable URLs is not necessarily a bad thing, it is important to track only the URL that are relevant and that we wish to rank for.
Website speed
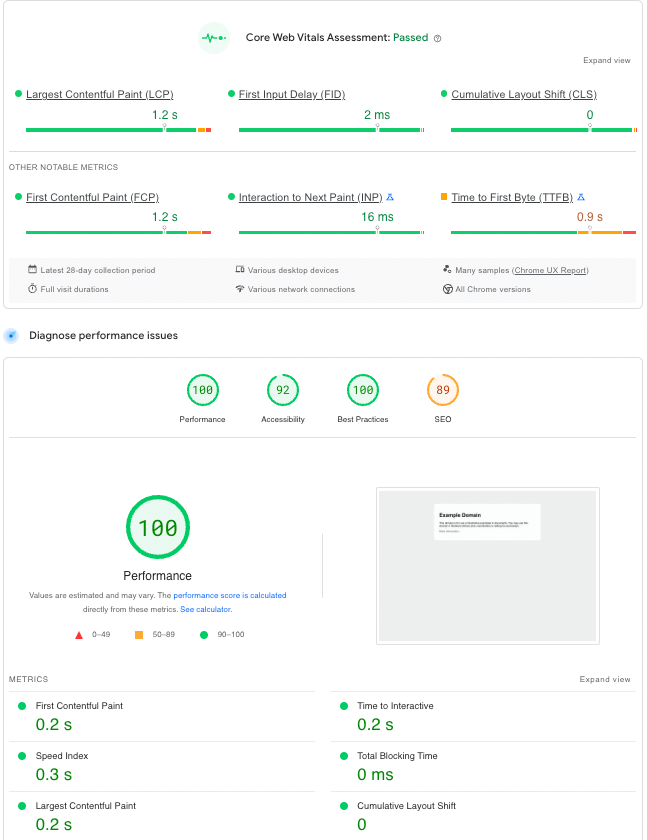
Page load speed is important for SEO because it is one of the key determining factors for Google’s algorithm. Website speed can easily be monitored online using websites such as PageSpeed Insights. By entering your website URL in the search bar of Page Speed Insights, you will immediately be given insights about your website’s performance according to the main speed metrics.
It is important to keep an eye out for Core Web Vitals, these are a set of pre-established metrics that Google deems essential to deliver a good user experience.
Core Web Vitals are:
- Largest Contentful Paint (LCP): measures loading performance. To provide a good user experience, LCP should be within 2.5 seconds of when the page first starts loading. First
- Input Delay (FID): measures interactivity. Pages should have a FID of 100 milliseconds or less.
- Cumulative Layout Shift (CLS): measures visual stability. Ppages have a CLS of 0.1. or less
If you wish to have a visual overview of your metrics during your website migration, we suggest using Google Looker Studio (formerly Google Data Studio). Here you can find a template and a more detailed guide on how to build your Data Looker Report.
Development phase
1. Crawl your old website and create inventory
Crawling your existing website is a fundamental part of a migration. This is a rather simple process that can be performed with several tools. At CLICKTRUST, we prefer Screaming Frog. This tool can be used to crawl both small and large websites, allowing you to analyse results in real-time and gather key SEO insights. The dashboard in Screaming Frog looks like this:
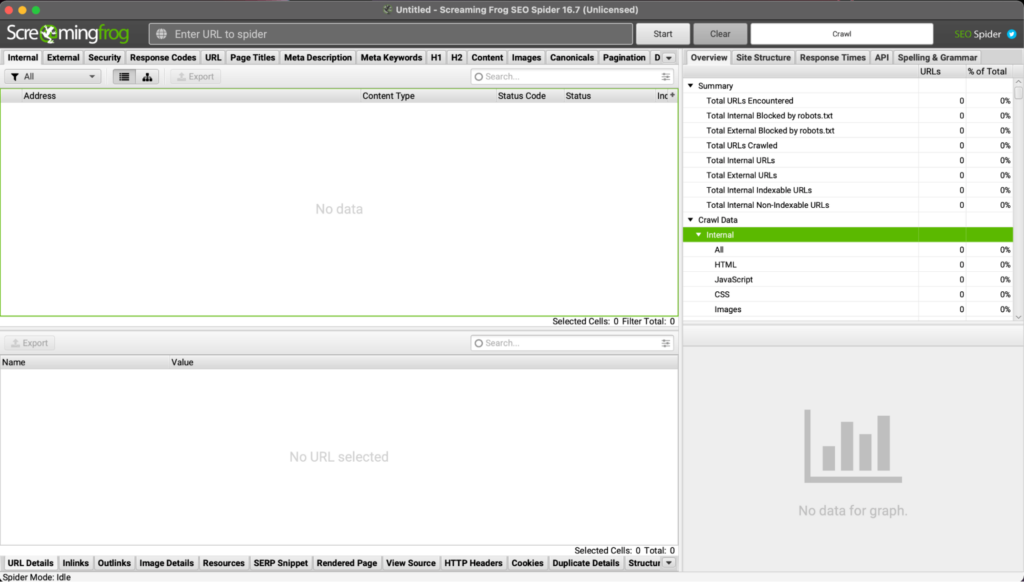
Whether you wish to start a complete audit of your website or to simply crawl a page, it often suffices to paste the URL of your website within the top bar.
For JavaScript-heavy websites, it might be a good idea to add the sitemap(s) in the configuration (‘Config > Spider > XML sitemap > Paste sitemap’). To identify JavaScript more efficiently, you’ll need to switch to JavaScript rendering mode (‘Config > Spider > Rendering’) and crawl the site, or a sample of templates from across the website. Here you can find more information on how to crawl Java script websites.
For very big websites, it’s a better idea to only crawl a specific part of the website instead of the entire website. This will avoid overloading the servers and your own computer.
It is essential that you create a comprehensive overview of all the content that is present on your website, including:
- Landing pages
- Articles
- Multimedia files
- Links (external and internal)
- Personal data
- XML sitemaps
Just like any inventory, this process will let you identify if anything gets lost through the migration.
2. Set up a testing environment
If the aim of the project is a CMS migration, it’s important that you set up a testing environment. It is a standard practice to launch the full website on the new CMS in the test environment first, this way you can compare how the site is behaving and identify any errors that might create problems in the future. Here you can more information on how to set up a test environment for your website.
3. Make sure that both site versions are registered in Google Search Console
This is an easy-to-do step, should you not know how to do this already, you can just follow the steps on the Google Support Page.
4. Temporarily block access to your new website
To avoid the 2 versions of your website to compete with each other, you should block access to your new site by using Robots.txt. To do so, it suffices to insert the following directives within your Robots.txt file:
User-agent: Googlebot
Disallow: /
But you have to keep in mind that you still want to grant access to the tools necessary for the migration. So, for instance, whether you are in Screaming Frog or SEMEush you can choose the option “ignore” Robots.txt. Although some might be tempted to use noindex tags, we strongly advise otherwise. Firstly, they imply considerably more work. Secondly, Google has pointed out that its bots remember directives. This means that if you are using noindex tags to block Google to access your website, it will remember even after the tags are removed and you risk delaying the indexing of your site.
5. Update internal linking
Make sure to update all internal links when migrating to your website, failing to do so might create redirect chains. Ultimately, this might compromise your SEO ranking as search engines might not be able to find and index all of your pages.
6. Update canonical links
Canonical tags allow Google to understand the original and preferred URL that might have been duplicated across several URLs. When wrongly implemented, canonicals can lead to wrong pages being canonicalised and wrong urls being indexed by Google, ultimately leading to mistakes and confusion among users.
Some things to look out for when implementing canonicals are:
- Use relative URLs in canonical tags
- Use canonical URL without any parameters
- Use the canonical URL without any hashtags
You can find more information on common canonical tag implementation mistakes here.
7. Prepare redirects
Based on the crawl that you have done, prepare a file which indicates what each old URL should be redirecting to. It does not have to be complicated, it can be a simple 2-column spreadsheet of Google Sheets, with old and new URLs.
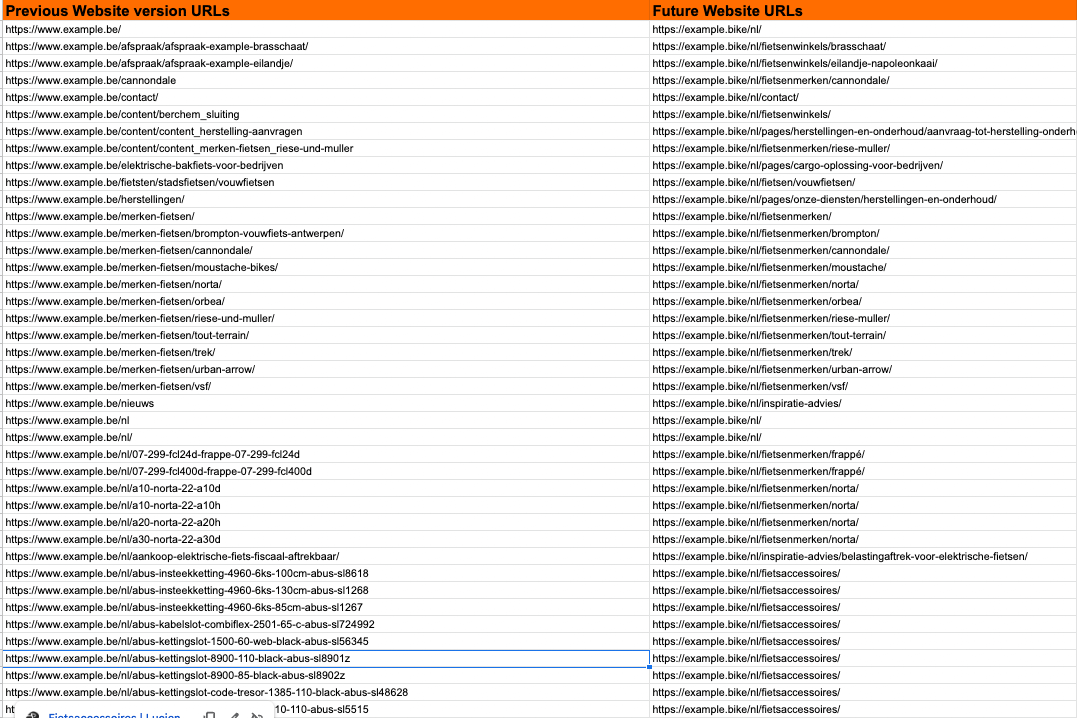
Once this is done, implement the list and test the rewrite rule that will 301 redirect the URLs.
8. Generate sitemap and robots.txt
Generate a new XML sitemap with the new website structure and new URLs that have been put in place. In case that you are running a multi-language website, we recommend implementing hreflang attributes to establish which language is used on specific pages.
Alongside the sitemap, you are going to need to prepare the robots.txt to upload to the new domain.
Post-migration
1. Remove website block
Remove the disallow that you have placed in your Robots.txt file that you have set up during the migration process to block Google from accessing your website.
2. Crawl your website
Once your new version is up and running, you should perform a crawl to identify possible mistakes. Make sure that you pay attention to:
- 404 errors
- Missing & incorrect canonicals
- Missing title tags & meta descriptions
- Duplicate URLs
- Broken internal links
- Redirected internal links
- Orphaned pages
These kinds of errors are rather common.
3. Check redirects
Crawl your new website and make sure that your previous URLs correctly 301 redirect toward your new website and that those give back a 200 status code. If you are wondering how to Bulk check redirects, you can refer to this guide.
4. Update your Ads URLs
If you are running ads for your website, you are going to need to communicate the new URLs to your marketing team so that they can update it on the platform. Should you fail to do so, the different domain might trigger a destination mismatch and ultimately a disapproval of your ads.
5. Validate 301 redirect rule
Double check that the 301-redirect rule to be sure that your old URLs or redirected to the correct URLs. Careless redirects might create redirect loops, chains and dead ends.
You can check for issues using either SEMrush or Screaming Frog. Within SEMRush, for instance, you can (re)run your site audit campaign to find out if everything is working according to plans.
Should there be fixes needed, SEMrush will explain to you the reason why this is happening and how to fix it. Following is an example of what the site audit insights look like:
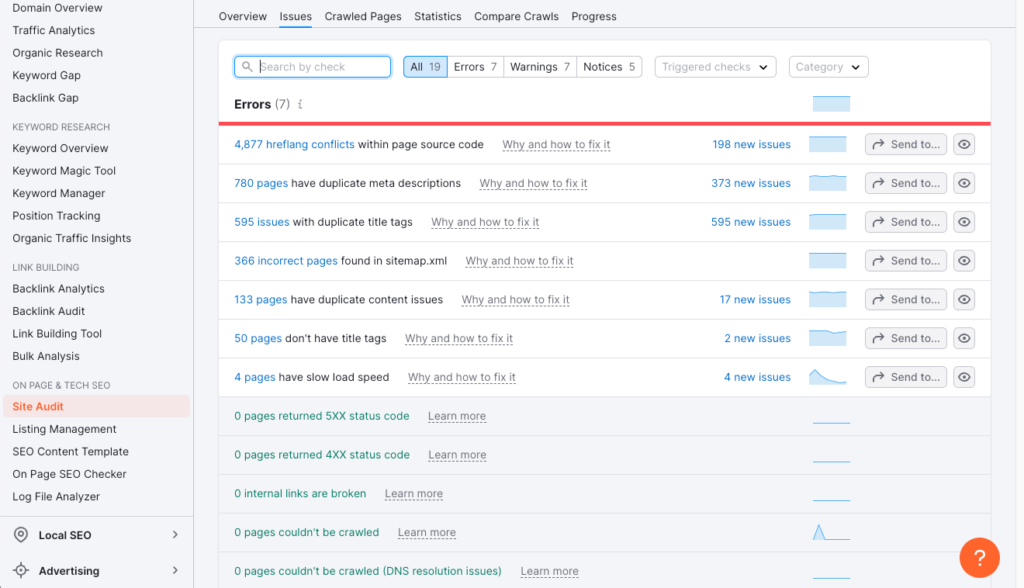
Lastly, following the migration, watch out for 404 errors and 500 status codes.
5. Monitor your traffic
Now that your website if fully migrated you can track and monitor the metrics that you selected at the beginning of the migration:
- Organic traffic
- Organic rank
- Page crawled
- Indexable URLs
- Website speed
As I mentioned earlier in the article, this can be done using a combination of tools such as SEMrush or Google Search Console and ideally you have your dashboard in Looker Studio that you can monitor for a better overview.
Get our ramblings right in your inbox
We deepdive into hot topics across digital marketing and love to share.