
In October 2020, Google launched the fourth iteration of its popular analytics platform: Google Analytics 4. In one of our previous articles, we already discussed the fundamental differences between Google Analytics 4 and Universal Analytics. Though we don’t see Google Universal Analytics disappear anytime soon, we do believe that Google Analytics 4 is the future.
In this article, we will discuss the most important things you need to know before upgrading to Google Analytics 4, as well as how to upgrade to GA4 and how to get the most out of it.
5 things you need to know before upgrading to Google Analytics 4
Are you considering migrating to Google Analytics 4 as well? Before we explain to you how to upgrade to GA4, here are some things you need to be aware of first:
GA4 is still in BETA
Google Analytics 4 is still in BETA, which means that there are still a lot of bugs. Even more important is that even after one year, a lot of essential features are still missing. Some examples include:
- Annotations
- Integration with Google Search Console, Google Optimize, …
- Exclude query parameters
- Calculated metrics
- Custom channel groupings
- Comprehensive filters
- Views
- Drill-downs in reports
- …
Because of this, we advise you to use Universal Analytics and Google Analytics 4 in parallel for now.
It’s not an upgrade. You need to create an additional GA4 property.
We admit it, our title might be a bit misleading. Rather than turning your existing Google Analytics property into a GA4 property, you will need to create a new property. As you will see later in this article, it is possible to have the two properties linked though.
You can’t migrate historical data to Google Analytics 4
Probably the biggest reason why you should “upgrade” to Google Analytics 4 is the fact that you can’t import historical data from your Universal Analytics property into your new GA4 property. So even if you decide not to actively use Google Analytics 4 just yet, you will have collected enough data by the time Google Analytics 4 leaves its “infancy” phase. All the more reason to set up Google Analytics 4!
If you have a App+Web property, you already have a GA4 property
If you already have an App+Web property set up, you’re lucky! Alll App+Web properties are already available as GA4 properties.
A good tagging plan is crucial
As with Universal Analytics, a tagging plan is crucial. Even more so in Google Analytics 4 because you now have to define your own naming conventions, as mentioned in our previous article on Google Analytics 4.
How to “upgrade” to Google Analytics 4
Creating a GA4 property in parallel with a Universal Analytics property
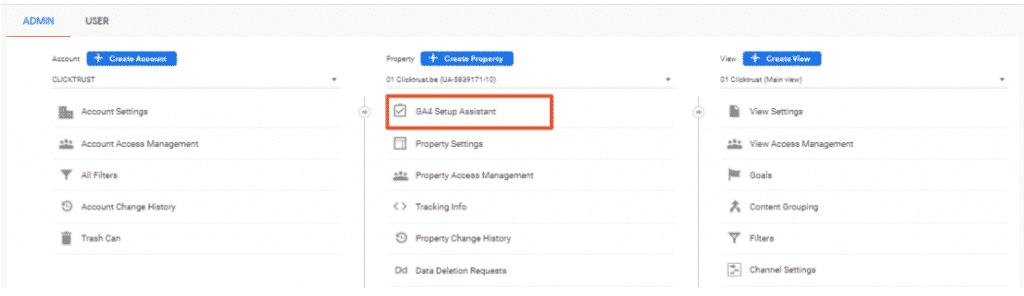
Within the admin section of your existing Google Analytics property, select the ‘GA4 Setup Assistant’.
Next, click the ‘Get Started’ button to set up your new Google Analytics 4 property.
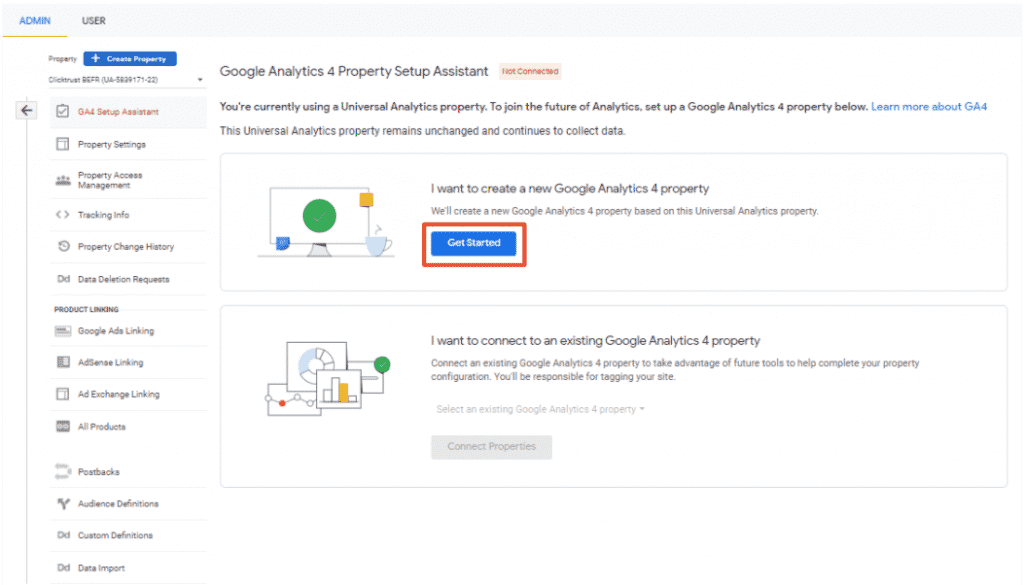
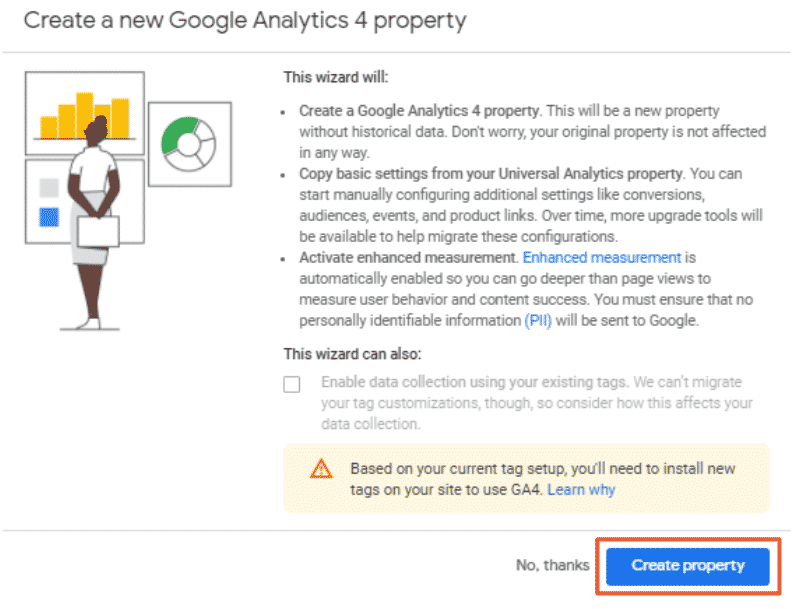
A pop-up window will appear. You can click on “Create property”.
That’s it. You’ve just created a Google Analytics 4 property. Within the ‘GA4 Setup Assistant’, you can see which GA4 property your UA property is linked to.
Creating a new GA4 property from scratch
You can also set up a GA4 property from scratch, though we strongly advise against that for now. In any case, these are the steps you need to take.
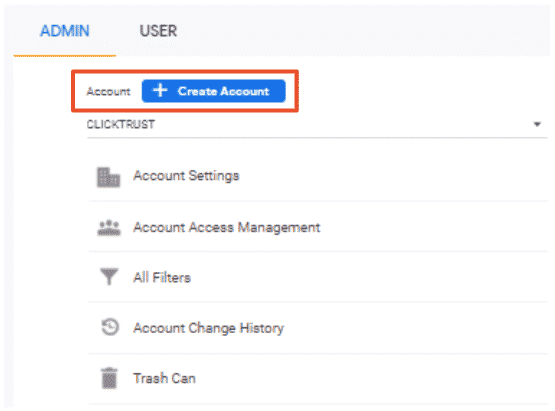
You will want to create a Google Analytics account first if you don’t have one already. In order to do that, you need to click the ‘Create Account’ button in the ‘Admin’ section.
Next, fill in the account details, as well as the details of your first property.
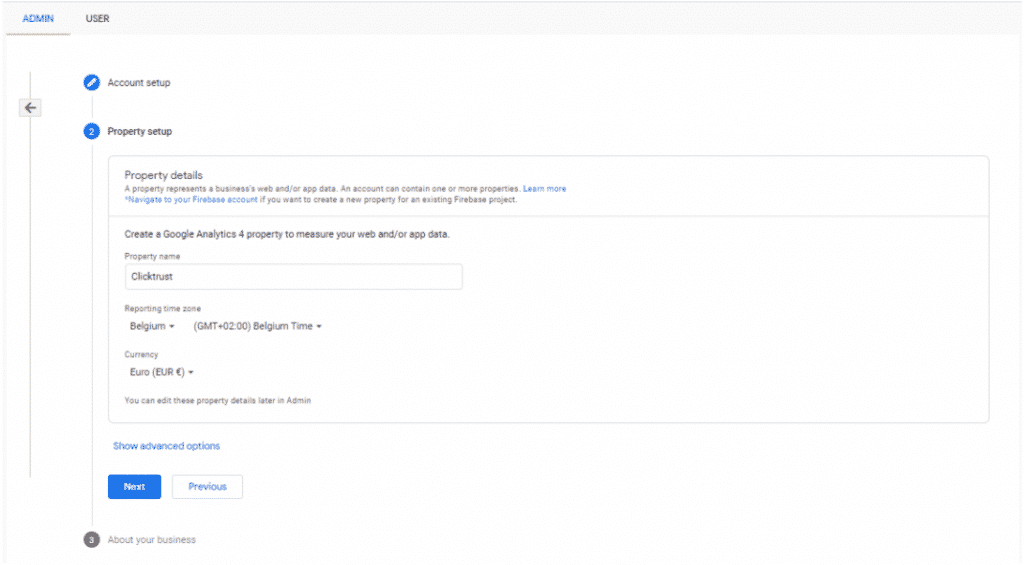
If you already have a Google Analytics account, you can create a new GA4 property by clicking on ‘Create Property’ in the ‘Admin’ section.

In this case, you will only have to fill in the details of your new property.
Creating a data stream in Google Analytics 4
Once you have set up your new GA4 property, you still need to add it to your website(s) and/or apps. Unlike Universal Analytics, Google Analytics 4 works with ‘Data Streams’. Each data stream is one website and/or app. You can add up to 50 of them to each GA4 property.
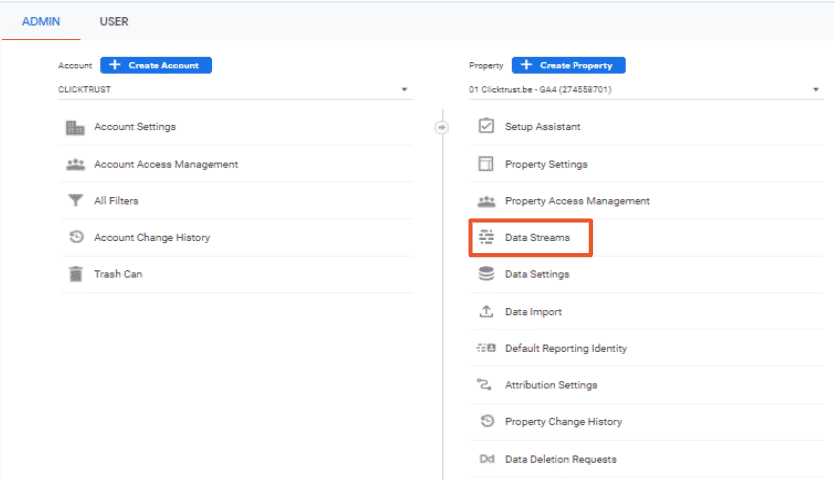
To create a new data stream, click on ‘Data Stream’ in the ‘Admin’ section.
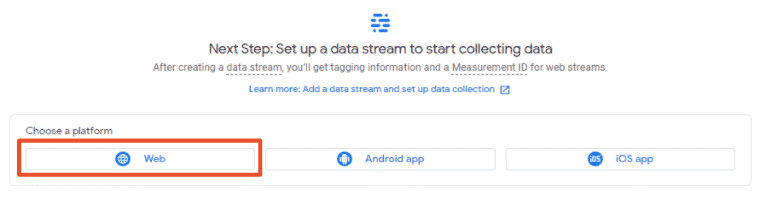
As you can see, you can add data streams for websites, Android apps and/or iOS apps:
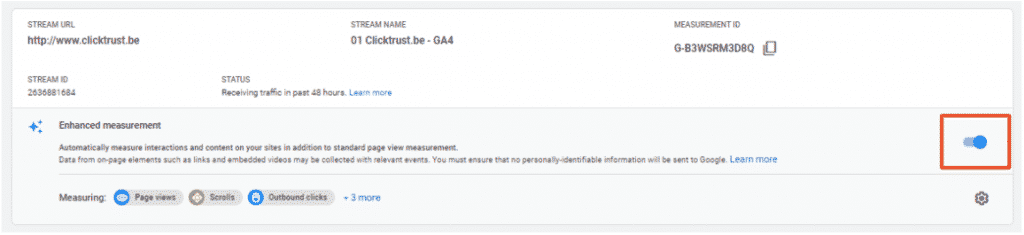
Let’s say we want to add a website data stream. All you have to do is fill in the URL of your website and give a name to the stream. By default, all enhanced measurement options are enabled. We recommend you to leave it like that. In the next section, we will explain exactly why.
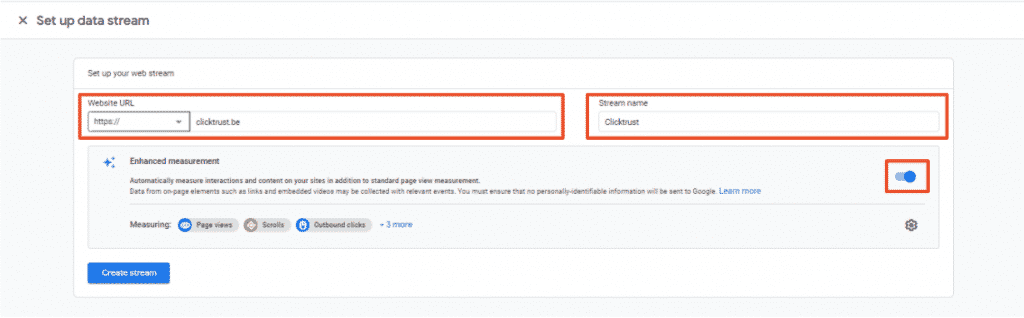
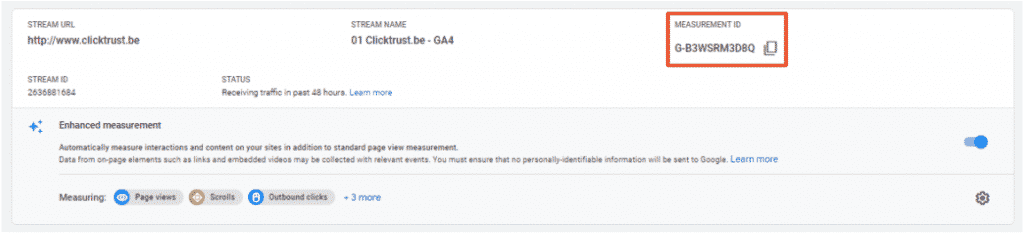
That’s it. You’ve just created your first data stream. Click on it and copy the Measurement ID, because we still need this for the final step.
Installing GA4 on your website
After creating a data stream for your website, the only thing left to do is to install Google Analytics 4 on your website. We recommend you to use Google Tag Manager for this.
If you don’t have Google Tag Manager (GTM) installed on your website yet, we advise you to follow this guide on how to set up and install a GTM account and container.
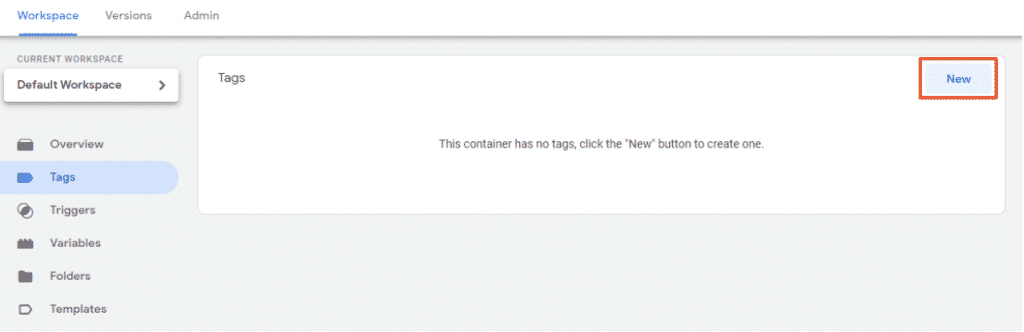
Once you have Google Tag Manager set up and installed on your website, you can create your GA4 tag by clicking on ‘New’.
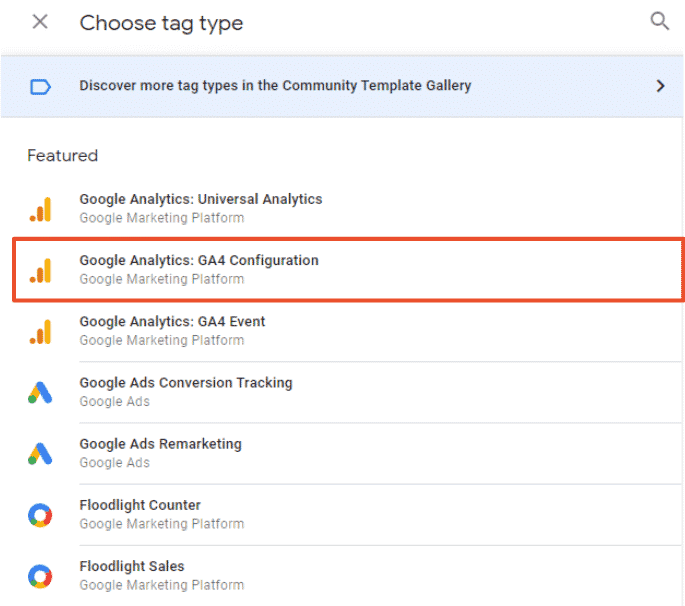
Give the tag a name that makes it easy for you to identify it. Next, choose the tag type ‘Google Analytics: GA4 Configuration’.
Now is the time to paste the measurement ID we just copied from your data stream. Finally, set the firing trigger to ‘All pages’ before saving.
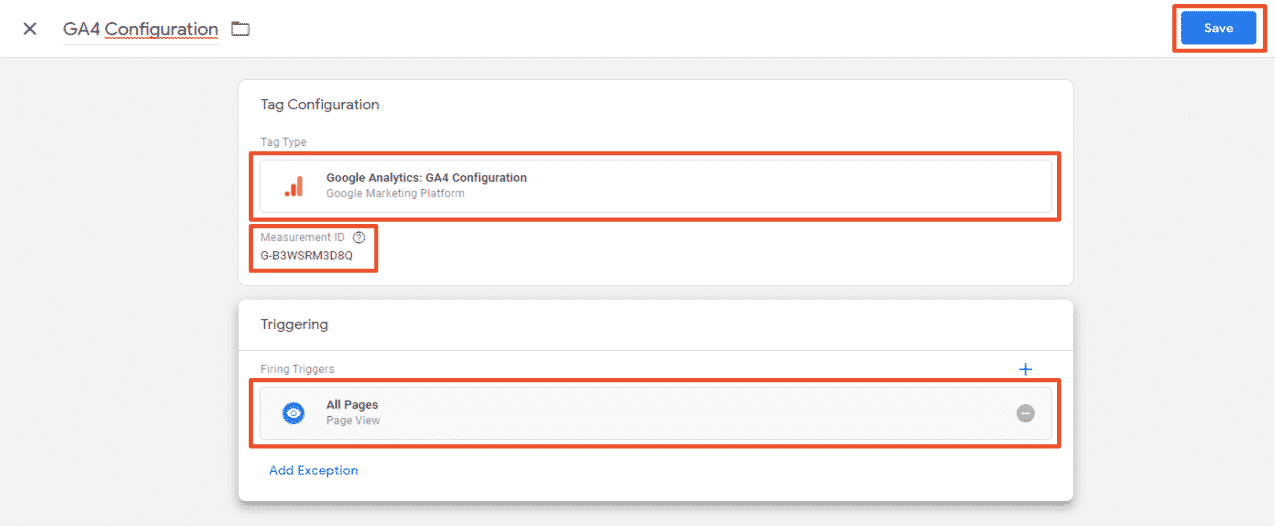
Submit your changes in Google Tag Manager and you’re all set up! Congratulations!
Getting the most out of Google Analytics 4
How to enable enhanced measurement in Google Analytics 4?
As explained in the previous section, ‘enhanced measurement’ is already enabled by default when creating a new data stream in GA4.
Enhanced measurement makes it possible for you to automatically collect insights into how people engage with the content on your website. This includes the following actions:
- page views
- scrolls
- clicks on outbound links
- site search
- video engagement
- file downloads.
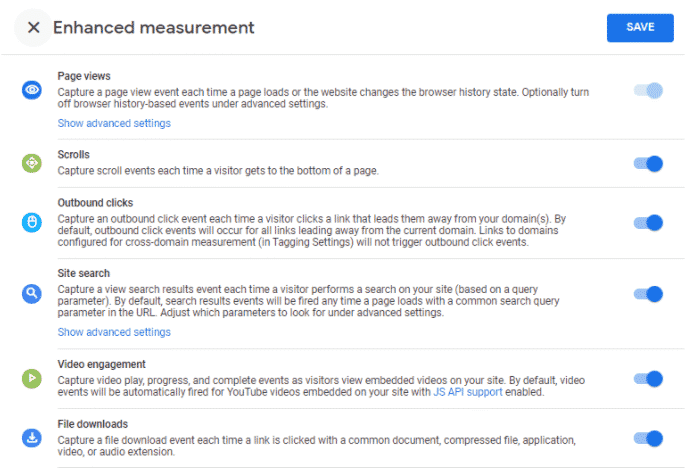
If you switched off ‘Enhanced measurement’ initially, you can still re-enable this option by navigating to your data stream. To do this, you need to click on ‘Data streams’ in the ‘Admin’ section. Then click on the data stream you want to edit and switch on the ‘enhanced measurement’ toggle.
How to and why link Google Ads to Google Analytics 4?
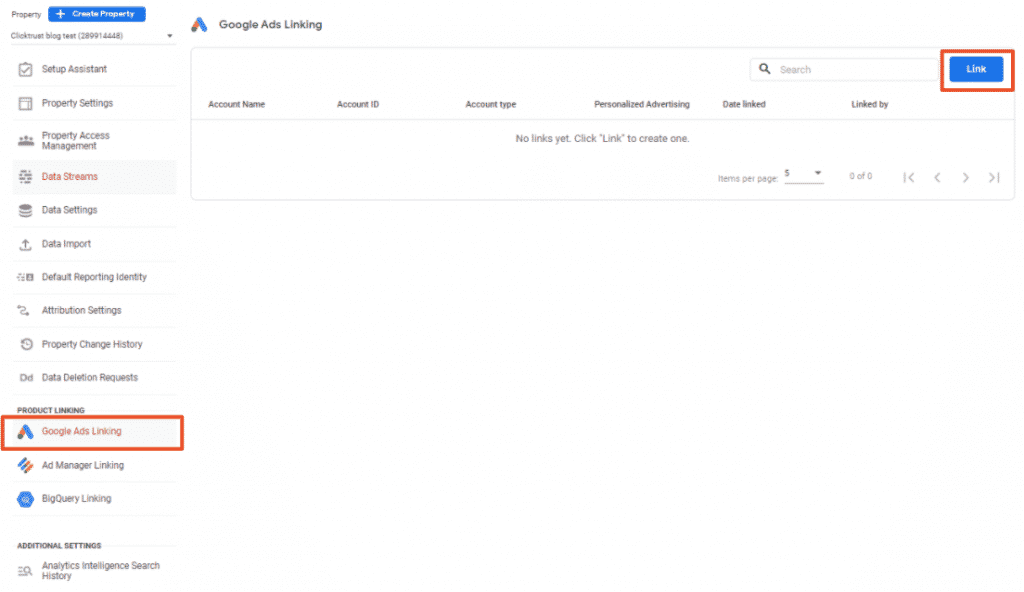
You can link up to 20 Google Ads accounts to a GA4 property. To set this up, you need to click on ‘Google Ads Linking’ in the ‘Admin’ section. If your Google Ads account(s) are not linked yet, click on ‘Link’, select all the accounts you want to connect and confirm.
By default, ‘Personalized Advertising’ and ‘Auto-tagging’ are enabled.
The option ‘Personalized Advertising’ allows you to have Google Analytics audience lists and remarketing events published to your linked Google Ads accounts.
‘Auto-tagging’, on the other side, is needed for a number of things:
- Tracking conversions on your website generated by Google Ads campaigns
- Import conversion data into Google Ads from Google Analytics 4
- Import Google Ads campaign & cost data into Google Analytics 4
- Import Google Analytics 4 site engagement metrics into Google Ads reporting.
As these are both very useful features, we strongly recommend you to leave both ‘Personalized Advertising’ and ‘Auto-tagging’ enabled. After checking your link setup, you can submit.
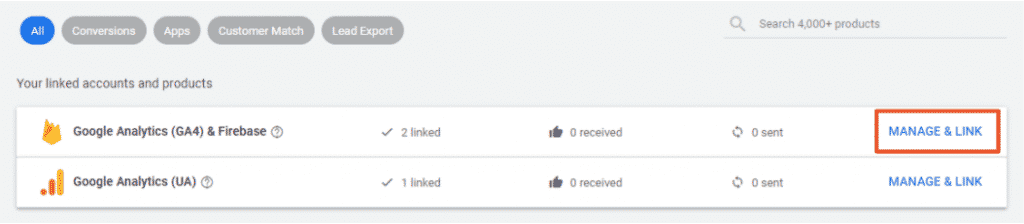
To see all the Google Analytics 4 properties that are linked to your Google Ads account, you have to navigate to ‘Linked accounts’ within the ‘Tools & settings’ in Google Ads. Clicking on ‘Manage & link’ next to ‘Google Analytics (GA4) & Firebase’ allows you to see all linked properties.
How to set up cross-domain tracking in Google Analytics 4?
Cross-domain tracking allows you to identify a user as one and the same user across different domains. Before setting up cross-domain tracking, it is good to know that it is not needed for subdomains of the same domain.
As mentioned above, we still recommend you to set up Google Analytics 4 in parallel to Google Universal Analytics. However, this also implies that you need to make sure to set up cross-domain tracking in Google Analytics 4 for the same domains as you did in Google Universal Analytics.
If cross-domain tracking on your website is currently set up through Google Tag Manager (GTM), you can check which domains are included by navigating to the ‘User-Defined Variables’ subsection within the ‘Variables’ section in GTM.
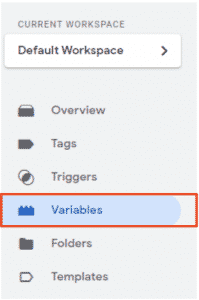
Within the ‘User-Defined Variables’ subsection, look for your Google Analytics settings variable and click on it. In there, you should see an overview of all domains included in the cross-domain tracking.
![]()
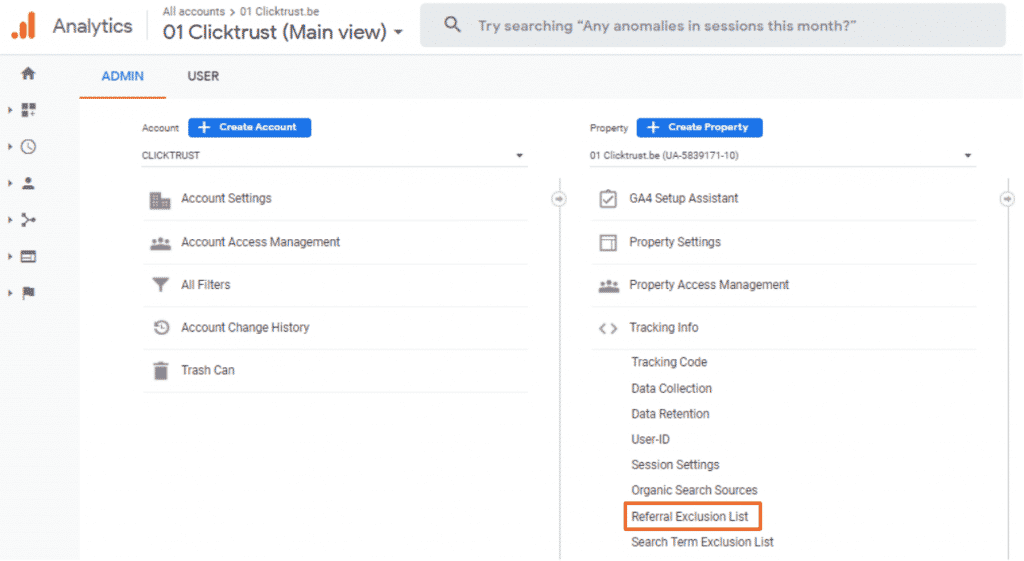
If your Universal Analytics is set up correctly, another way to get an overview of all domains included in cross domain tracking is by checking the referral exclusion list. To find this, you have to click on ‘Tracking info’ in the ‘Admin’ section of the GA property of your main domain. You can see the overview after clicking on ‘Referral Exclusion List’.
Once you know which domains you want to include in your cross-domain tracking, navigate to the data stream of your main domain as explained before. Within your data stream, click on the option ‘More Tagging Settings’.
![]()
Then, click on ‘Configure your domains’.
![]()
Fill in the URL of all the domains you want to include, as shown below. There is no need to include “https://” here. After saving, your cross-domain tracking is all set up.
![]()
How to enable data collection through Google Signals?
Google describes ‘Google Signals’ as “session data from sites and apps that Google associates with users who have signed in to their Google accounts, and who have turned on Ads Personalization collection agreement.” Enabling this option allows:
- Cross-device reporting
- Cross-device remarketing
- Cross-device conversion export to Google Ads
- Reporting on Demographics and Interests
To enable Google signals data collection, navigate to ‘Data Settings’ in the ‘Admin’ section of your GA4 property. Next, click on ‘Data Collection’ and then on ‘Get started’ in the ‘Enable Google signals data collection’ section.
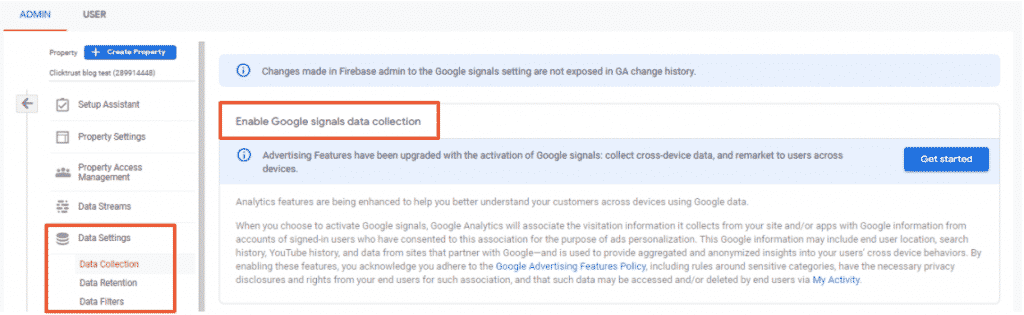
Google Analytics 4 will give you an overview of all features enabled by Google Signals. After reading this, you can click on ‘Continue’. You can activate Google Signals at the bottom of the next screen by clicking on the button ‘Activate’.
Acknowledging the data collection agreement
On the same page, you will see the sentence ‘User Data Collection Acknowledgement’. Accepting this means that you confirm that you have the rights from your end users to collect and process their data.
If you don’t see a green checkmark accompanied by the words “Acknowledged’, it means you still have to acknowledge the data collection agreement. To do this, simply click on the arrow on the right and click on ‘I acknowledge’.
How to set data retention time
Google has built GA4 so that it no longer relies on cookies. Instead, it will use Google Signals combined with machine learning. Unlike Universal Analytics, in which it is possible to store data up to 50 months, Google Analytics 4 only allows retention for user-level data for 14 months.
Below the option ‘Data Collection’ in ‘Data Settings’ that we just used to enable Google Signals and acknowledge the data collection agreement, you have a second option ‘Data Retention’.
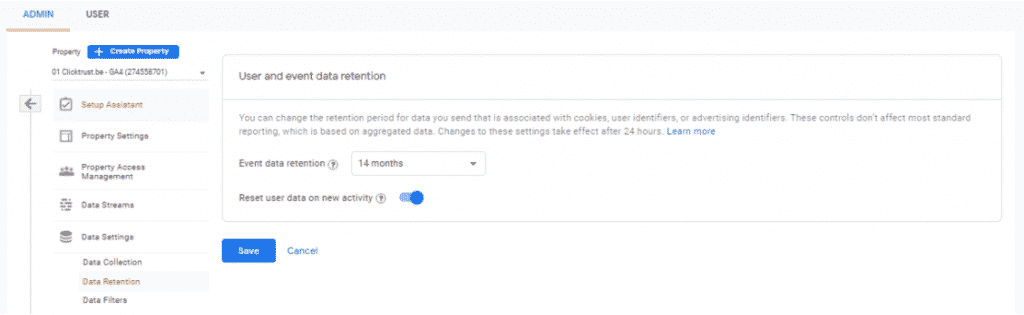
By default, the data retention time is set to 2 months. You can change this to the maximum of 14 months by selecting it and clicking on ‘Save’.
How to set the default reporting identity?
Google Analytics 4 can use 3 types of identifiers to stitch together different sessions from the same user on different devices. Above, we already discussed the first one, Google Signals. The other two identifiers are:
- User ID: IDs assigned to signed-in users on your website cross-platform and included in the data that is sent to Google Analytics
- Device ID
You can choose the identifier for your GA4 property, by clicking on ‘’Default Reporting Identity’ in the ‘Admin’ section.
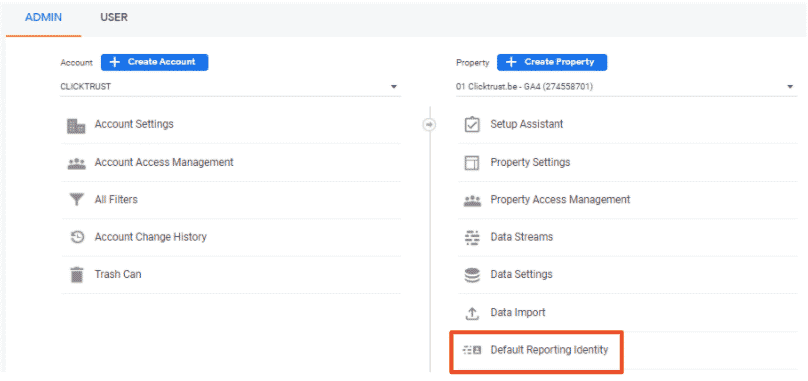
If you just set up your GA4 account, you will likely only see two options: ‘By User-ID and device’ and ‘By device only’.
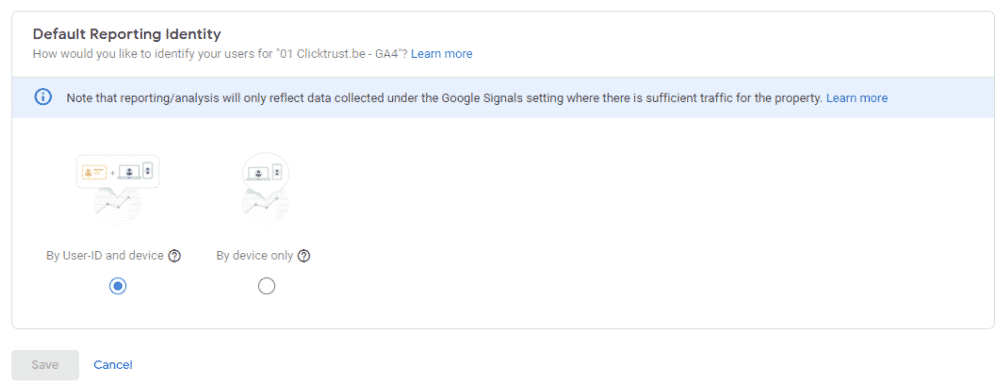
There is a third option: ‘By User-ID, Google signals, then device’. However, you can only use this option once Google Signals has gathered enough data. The reason for this is that Google wants to guarantee the anonymity of its users.
So for now, you will have to choose between the other two options by selecting one and clicking on ‘Save’.
Attribution models in Google Analytics 4
Unlike Universal Analytics, there are only 2 attribution models available in Google Analytics 4: Cross-channel last click and Ads-preferred last click.
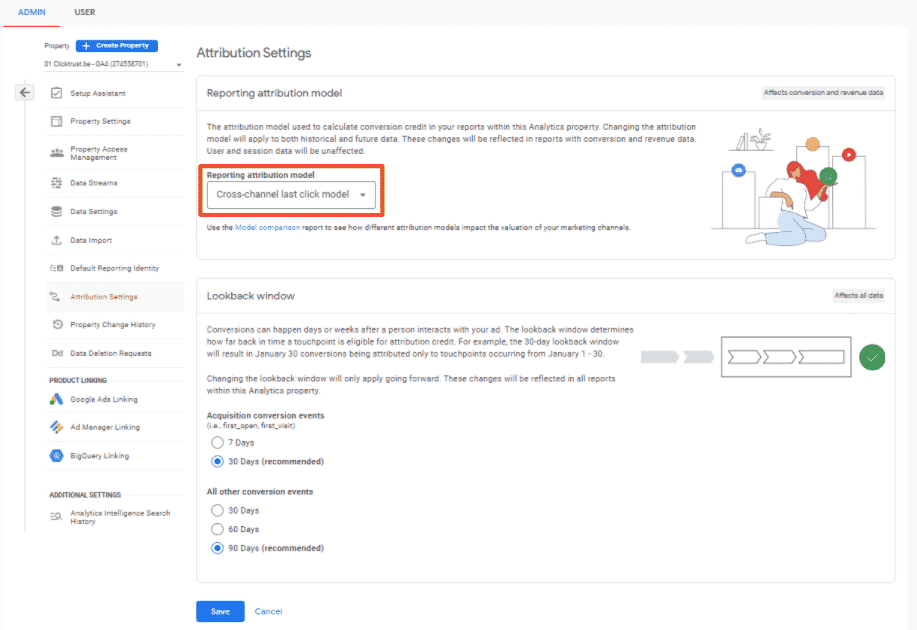
By default, the ‘Cross-channel last click model’ is selected. We recommend keeping this one. If, for some reason, you would like to change this though, you can do so by clicking on ‘Attribution Settings’ in the ‘Admin’ section. Next, you need to select the ‘Last click’ attribution model below ‘Ads-preferred’. Do not forget to save your new settings.
Below, you can also change the lookback window for acquisition and other conversion events. Here, we recommend you to stick to the default recommended settings as well. However, you can easily change this by selecting another option and clicking on ‘Save’.
How to create custom dimensions in Google Analytics 4?
In Google Analytics 4, it is possible to define up to 50 custom dimensions and 50 custom metrics. These custom metrics and dimensions get their values from the event parameters that you collect for your property.
To do this, click on ‘Configure’ in the left panel and navigate to ‘Custom definitions’.

For this tutorial, we are setting up a custom dimension for ‘percent_scrolled’. Setting up a custom metric works similarly.
To set up a custom dimension, start by clicking on ‘Create custom dimensions’. Next, give your dimension a name and choose the event parameter to be used in this dimension. You can select one from the drop-down list or define one you will collect in the future.
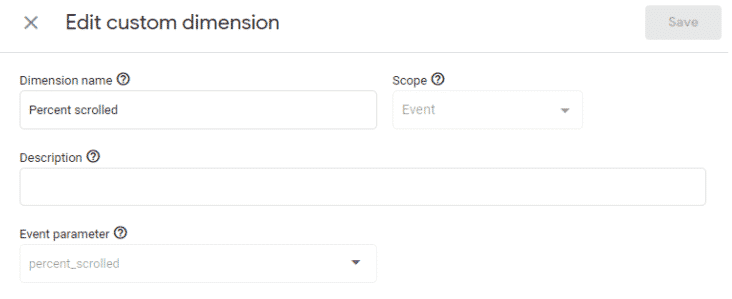
Once you’re done, click on ‘Save’. That’s it, you’ve just created your first custom dimension, which we will use in the next section.
How to create custom events in Google Analytics 4?
Now that you have fully set up your Google Analytics 4 property, you are ready to create your first events and conversions.
To do this, click on ‘Configure’ in the left panel and navigate to ‘Events’. Then, click on ‘Create event’.
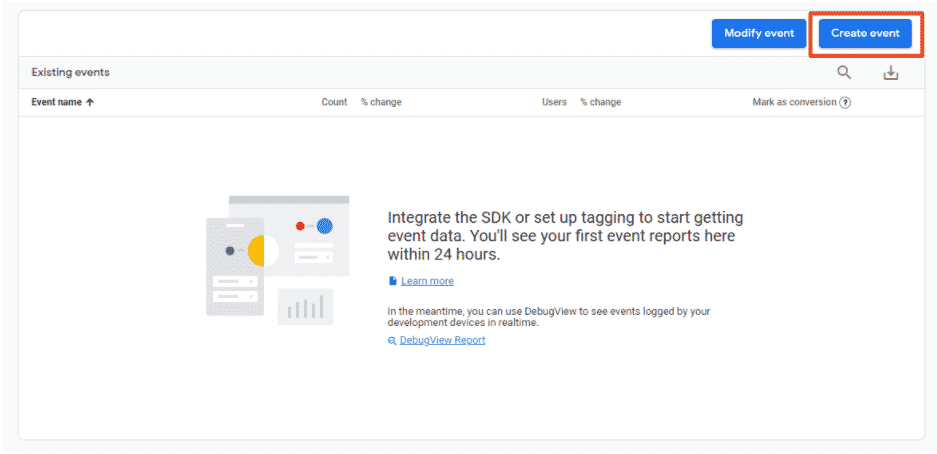
Click ‘Create’ once again to create a custom event. Start by giving the event a name. Once you have done that, you can specify the conditions on which the event should be triggered.
For this tutorial, we are creating an event for tracking everyone that scrolls at least 90% down a page. For that, we need two parameters:
- percent_scrolled, the custom dimension that we just created (see section above)
- event_name
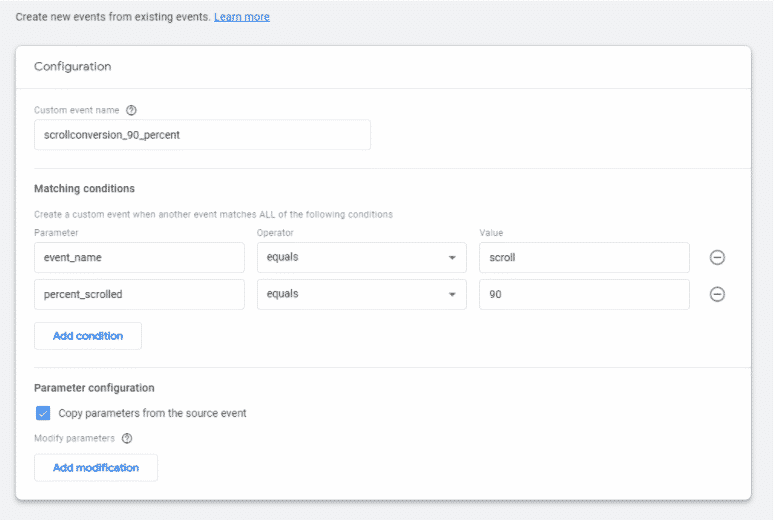
After you’ve filled in the matching conditions, you can click on ‘Create’ to finish the setup of your custom event.
How to create conversions in Google Analytics 4?
The easiest way to set up a conversion in Google Analytics 4 is by marking an event as a conversion in the ‘Event’ section. You can do this by simply switching on the toggle next to the conversion.
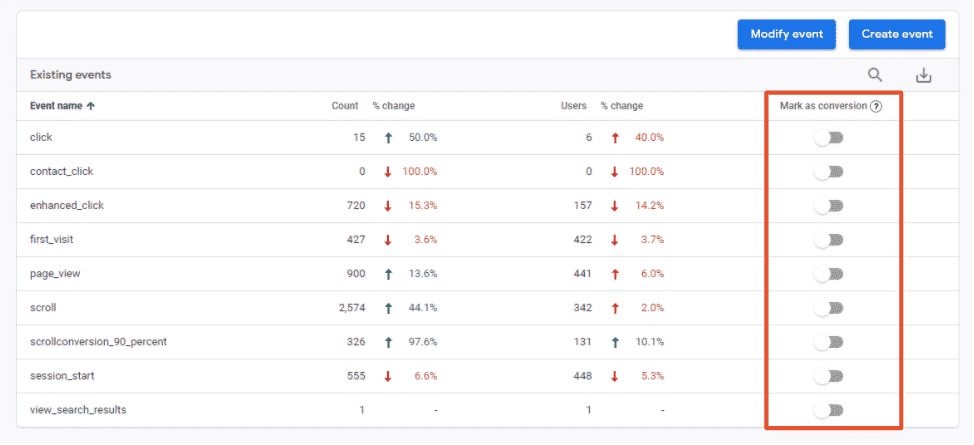
You can see an overview of all your conversions in the ‘Conversions’ subsection just below ‘Events’.
How to create audiences in Google Analytics 4?
Finally, it is also possible to create up to 100 custom audiences in Google Analytics 4. To set up your audience, click on ‘Configure’ in the left panel and navigate to ‘Audiences’. Then, click on ‘New audience’.
For this tutorial, we are creating an audience with all the users who visited the ‘Academy’ in the last 30 days. To do this, we first select the event ‘page_view’. Do note, however, that you can not only select events, but also dimensions and metrics when creating a custom audience.
After that, we have to include a parameter. As we want to include only people that visited an ‘Academy’ page, we add the parameter ‘page_location’ with the condition to contain “academy”.
Finally, we can choose the membership duration. For this example, we are going with the default of 30 days, but you can choose any duration up to 540 days.
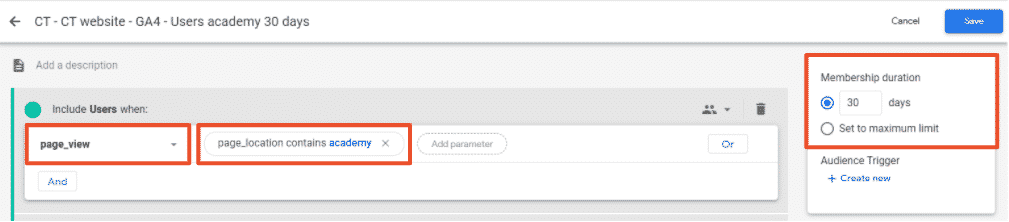
Finish the setup of your audience by clicking on ‘Save’.
Hungry for more? Make sure to subscribe to our newsletter or enroll for our Google Analytics & Google Analytics 4 course.
Get our ramblings right in your inbox
We deepdive into hot topics across digital marketing and love to share.